Week Twelve and Thirteen

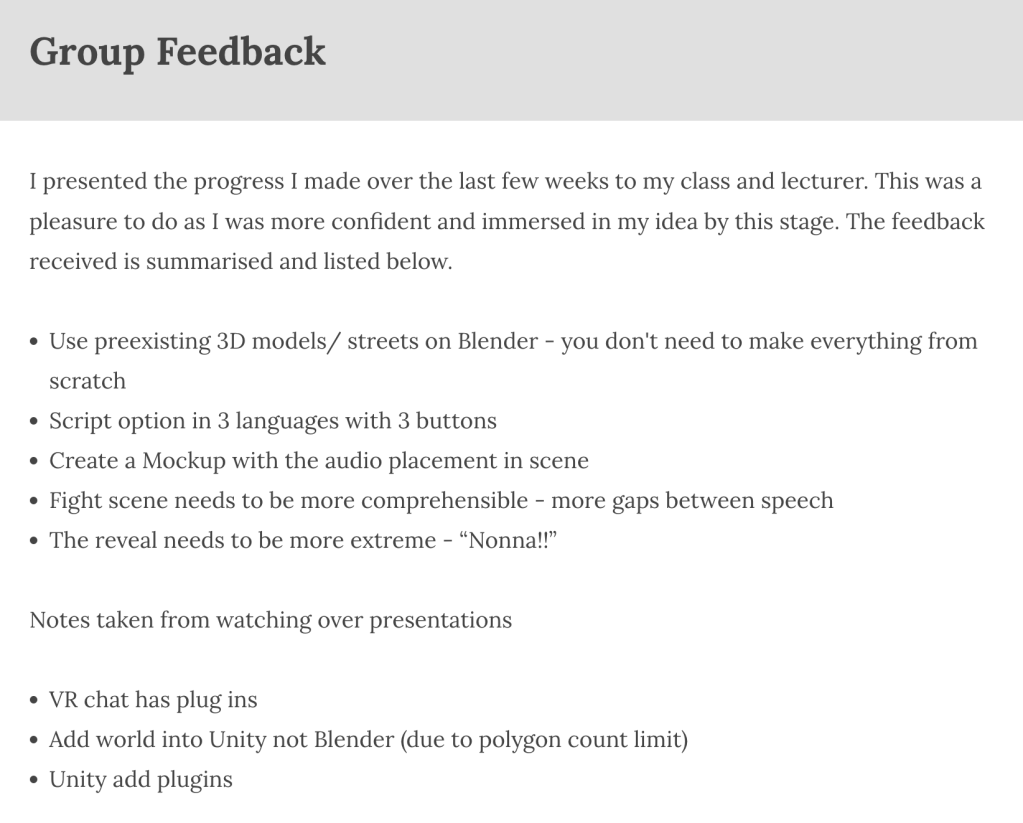
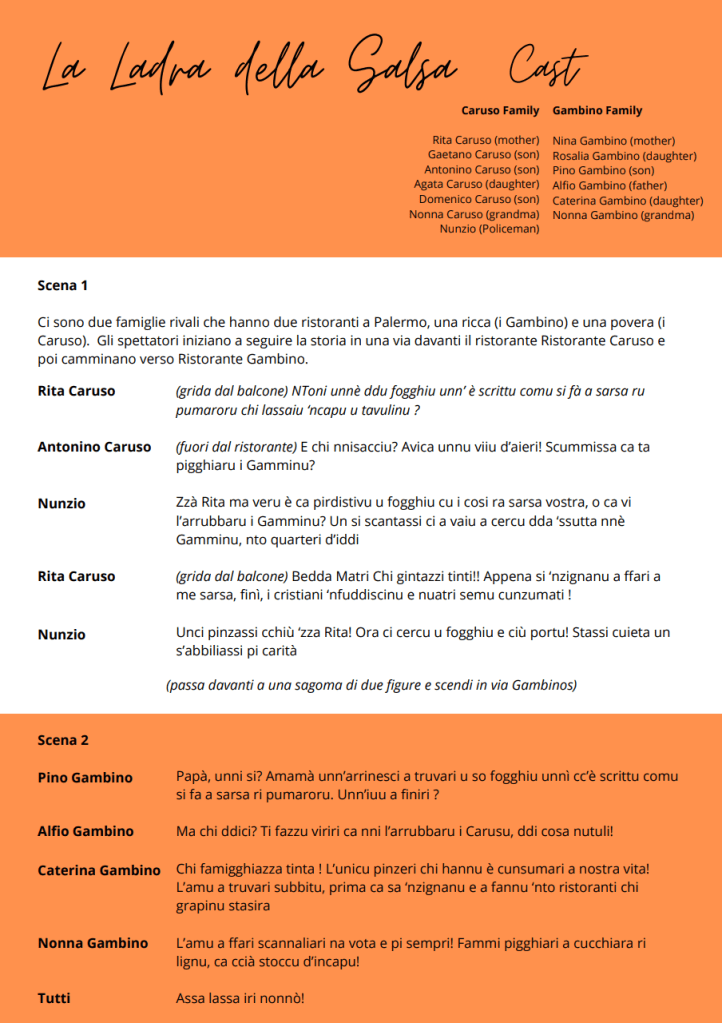
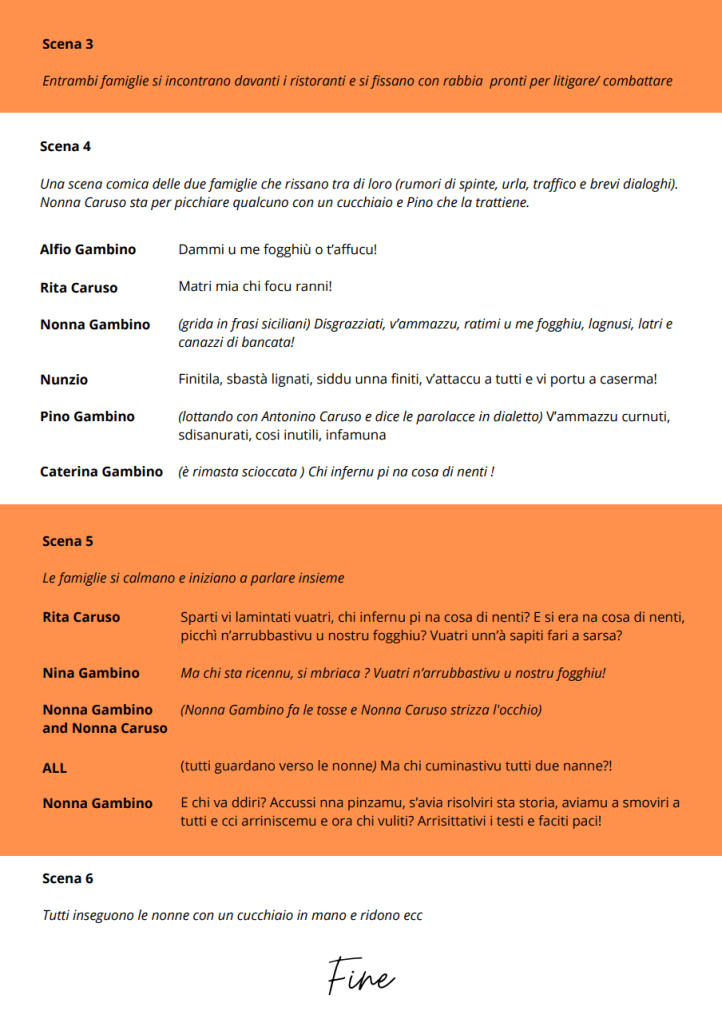
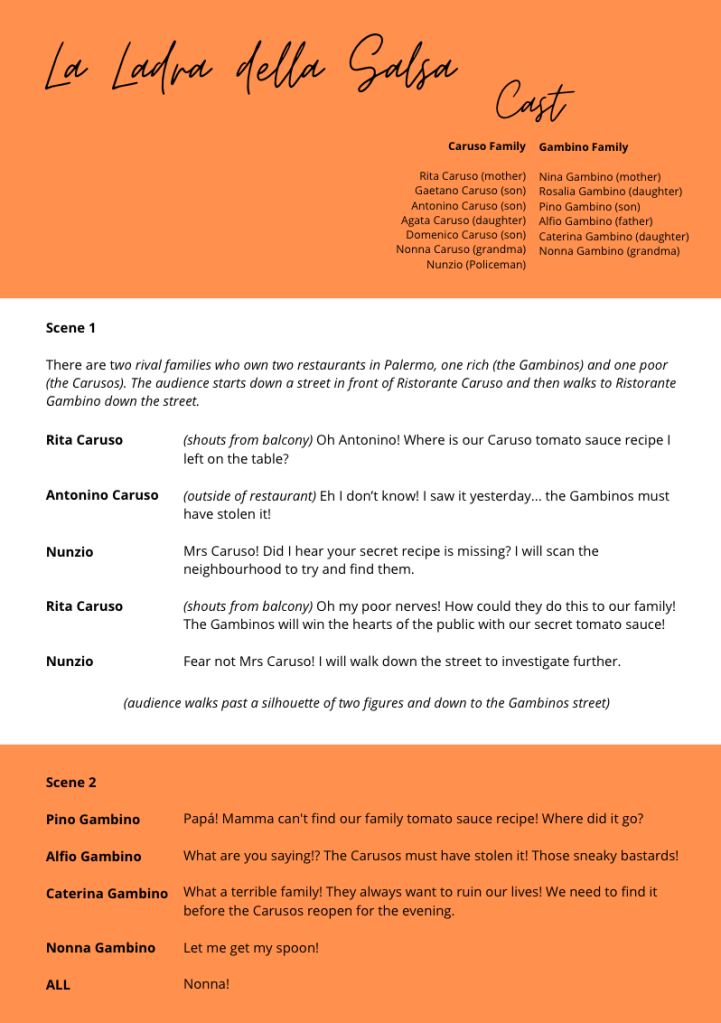
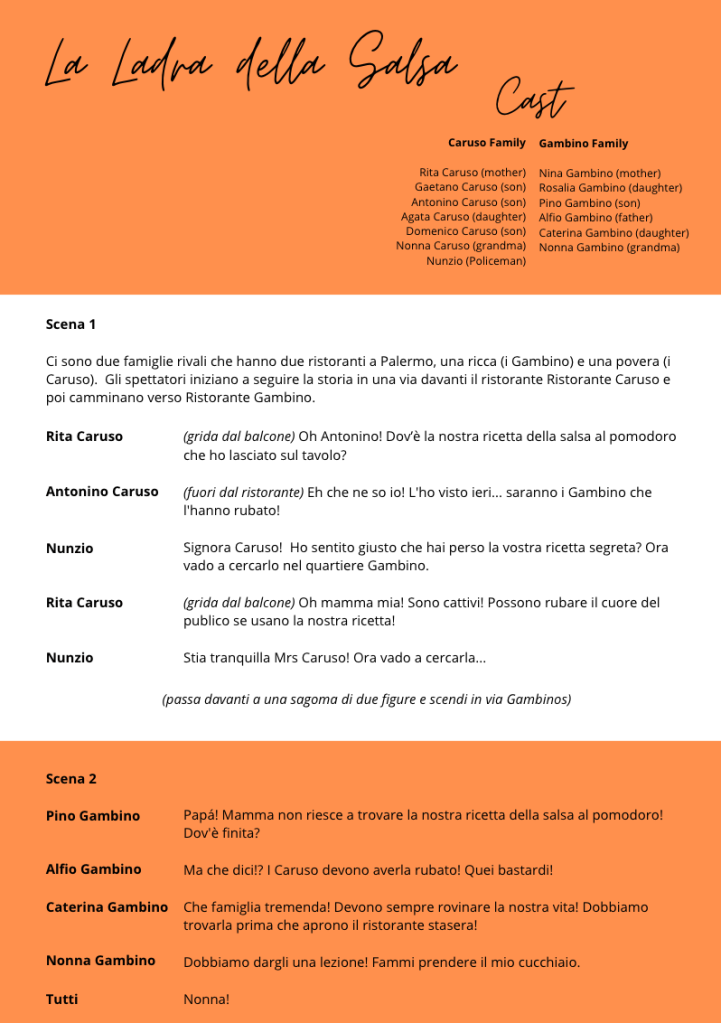
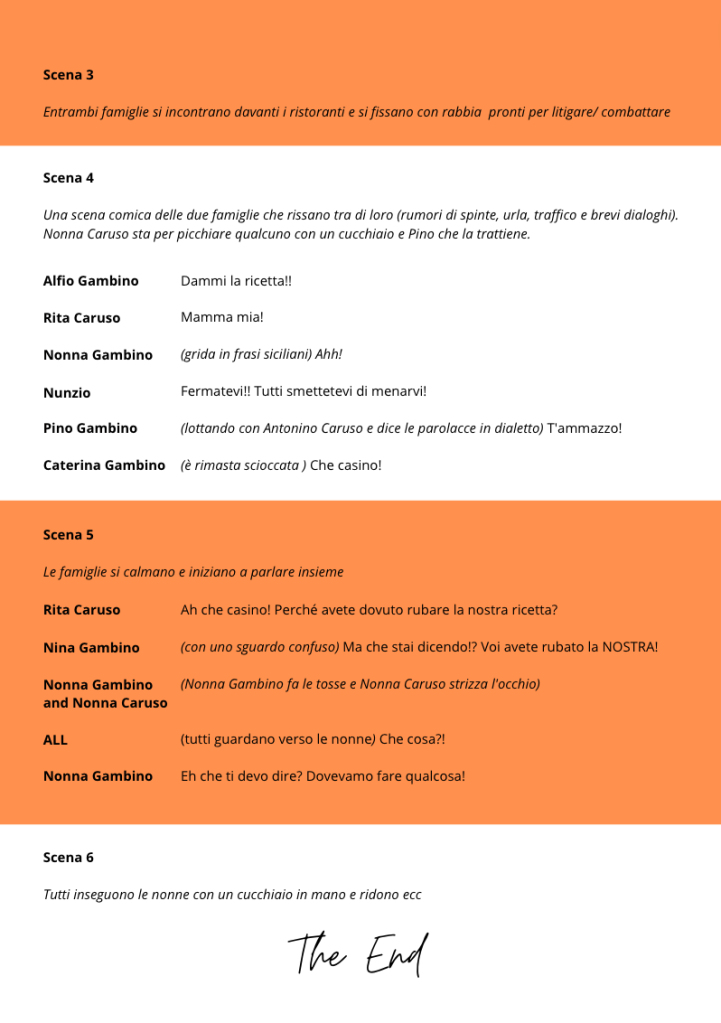
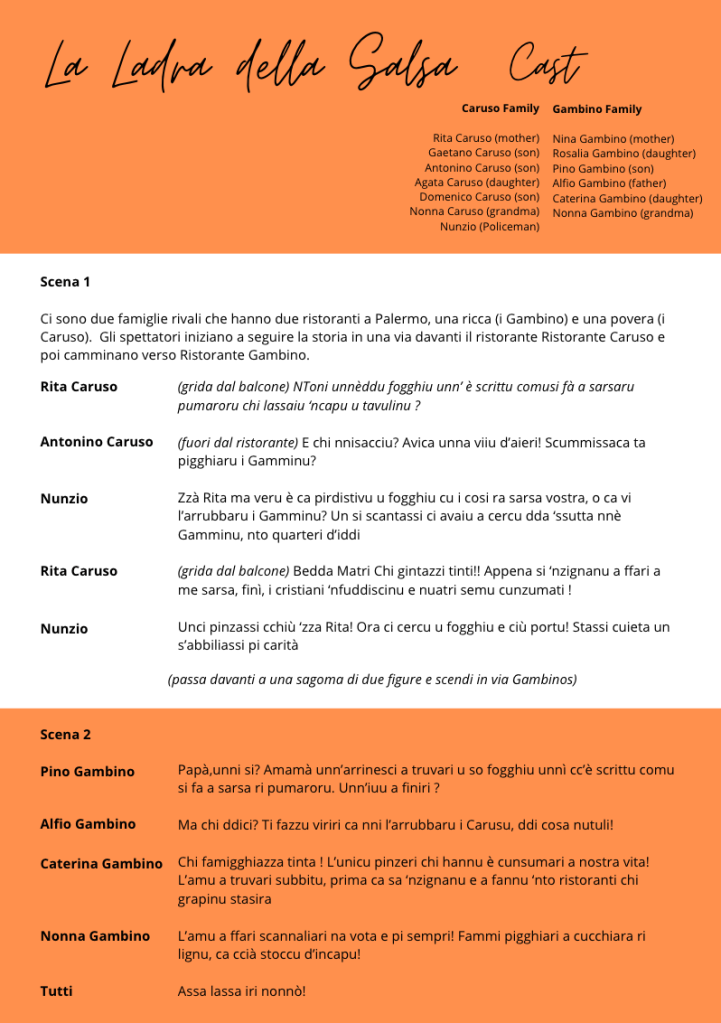
Final Presentation and Documents

On the final teaching week, we presented our major projecr outcomes and our PDF submission ideas to hand in in a months time. The presentation went well and I was inspired by how the others presented their work too. I spent the final weeks of the module finishing my blogs, developing my final PDF and 2000 word write-up. Doing this at this stage meant that I could reflect on my work and see how much progress I had made up until this point.

VR Amendments

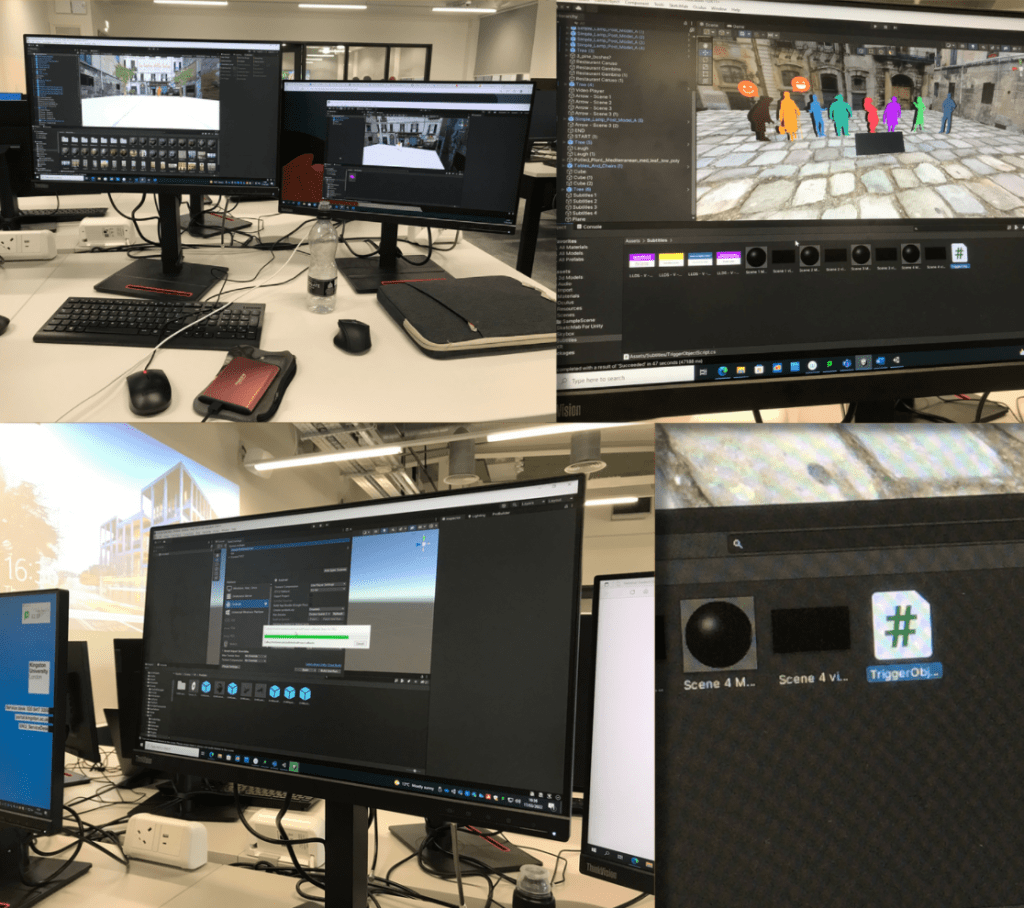
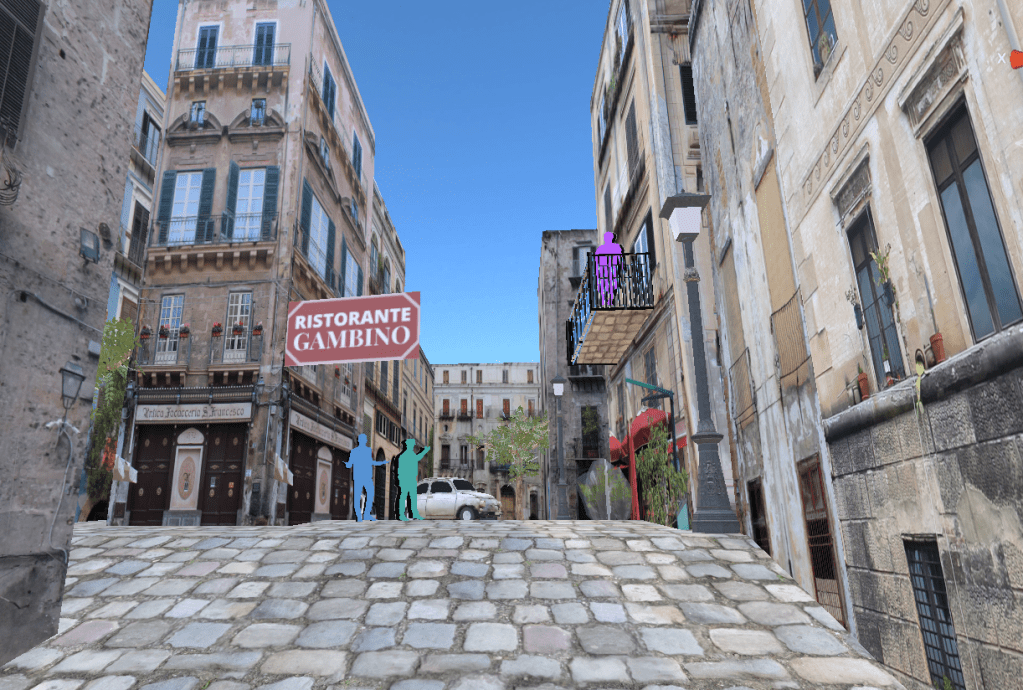
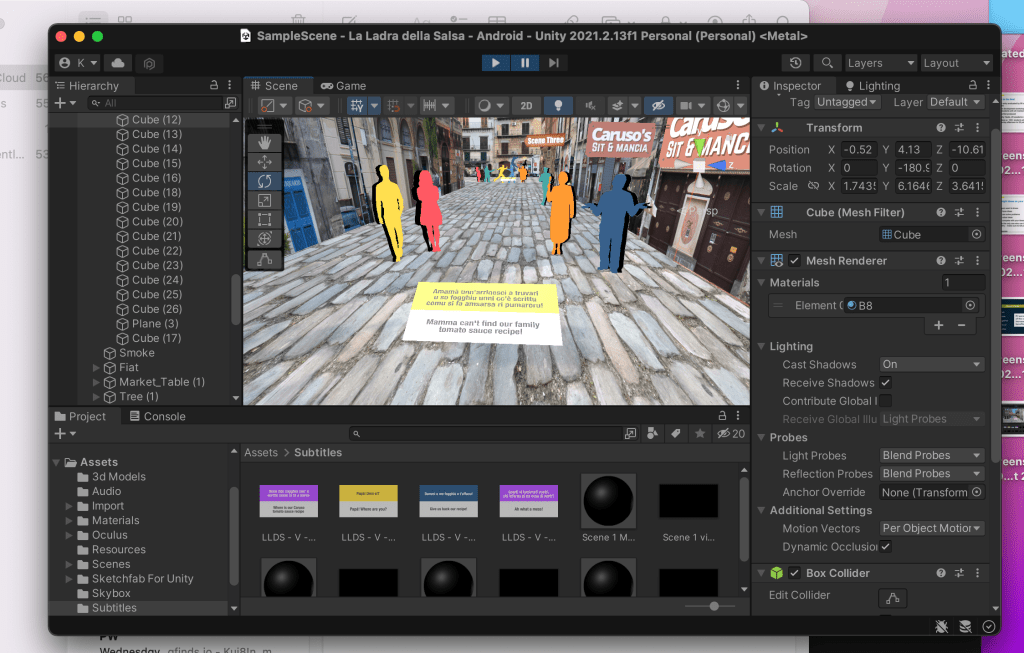
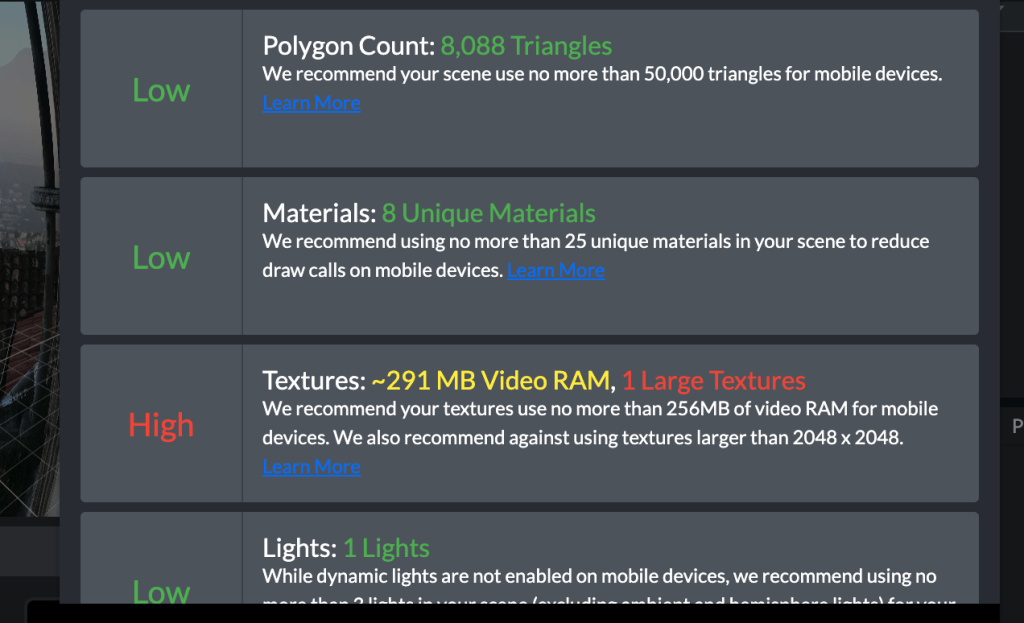
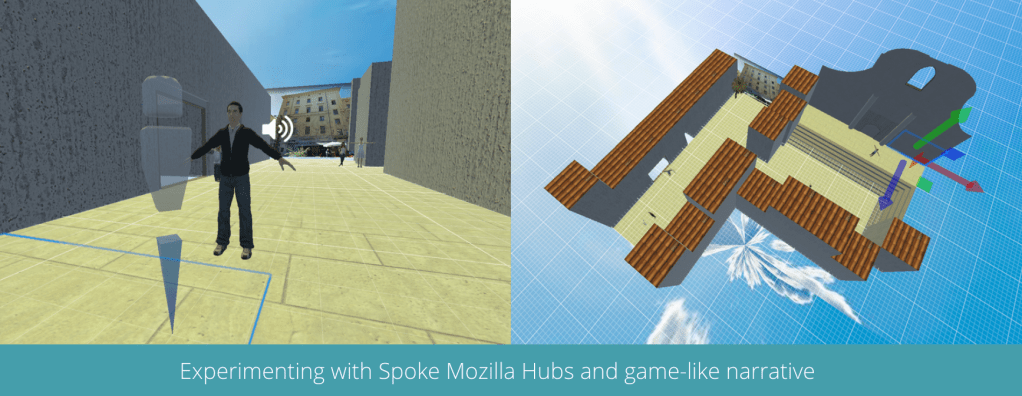
As the VR APK was now working on the headset, I was able to make some final amendments to the scene. I started my reducing the spawn size so it wasn’t gigantic anymore.

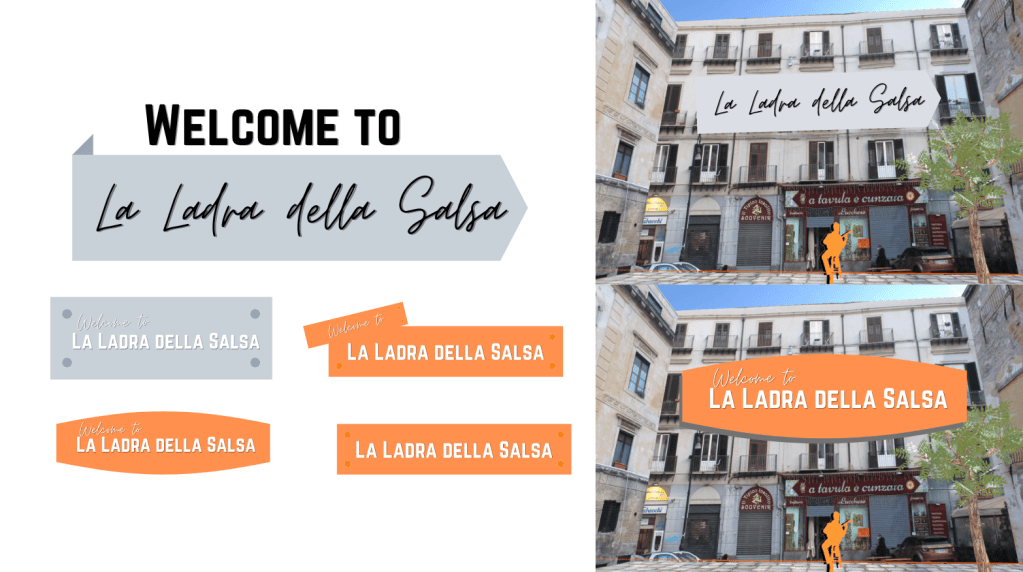
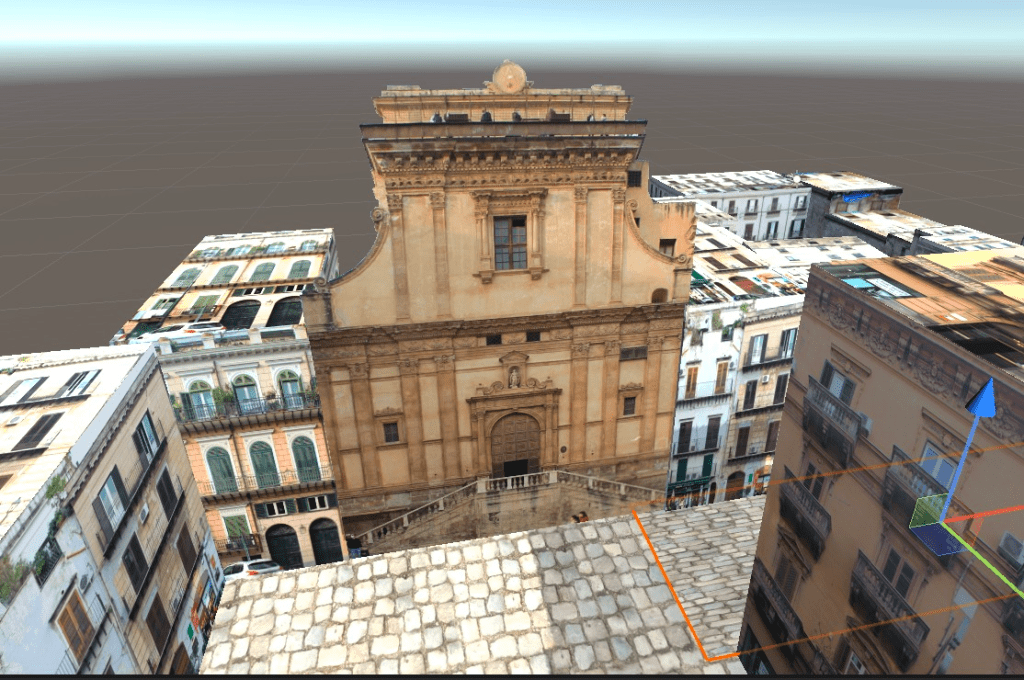
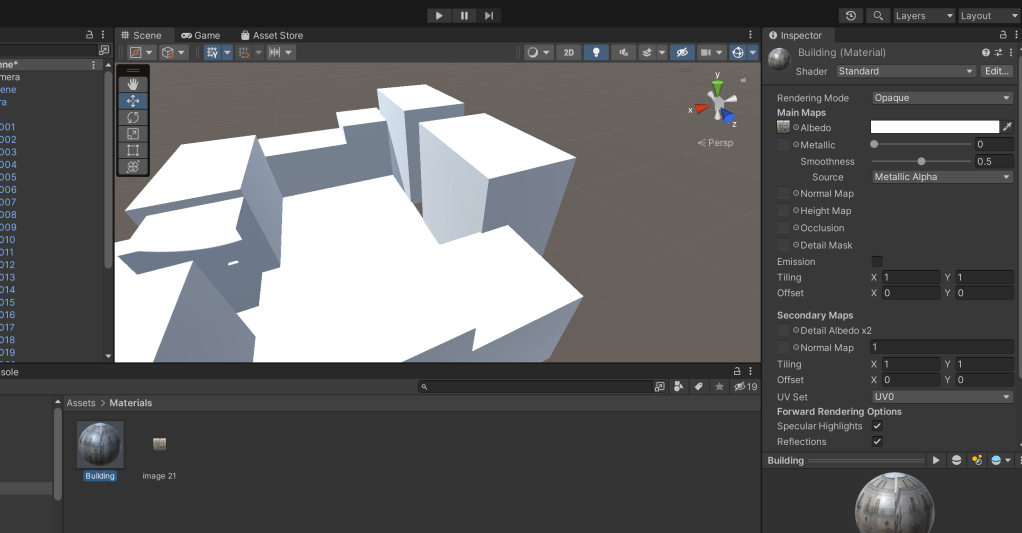
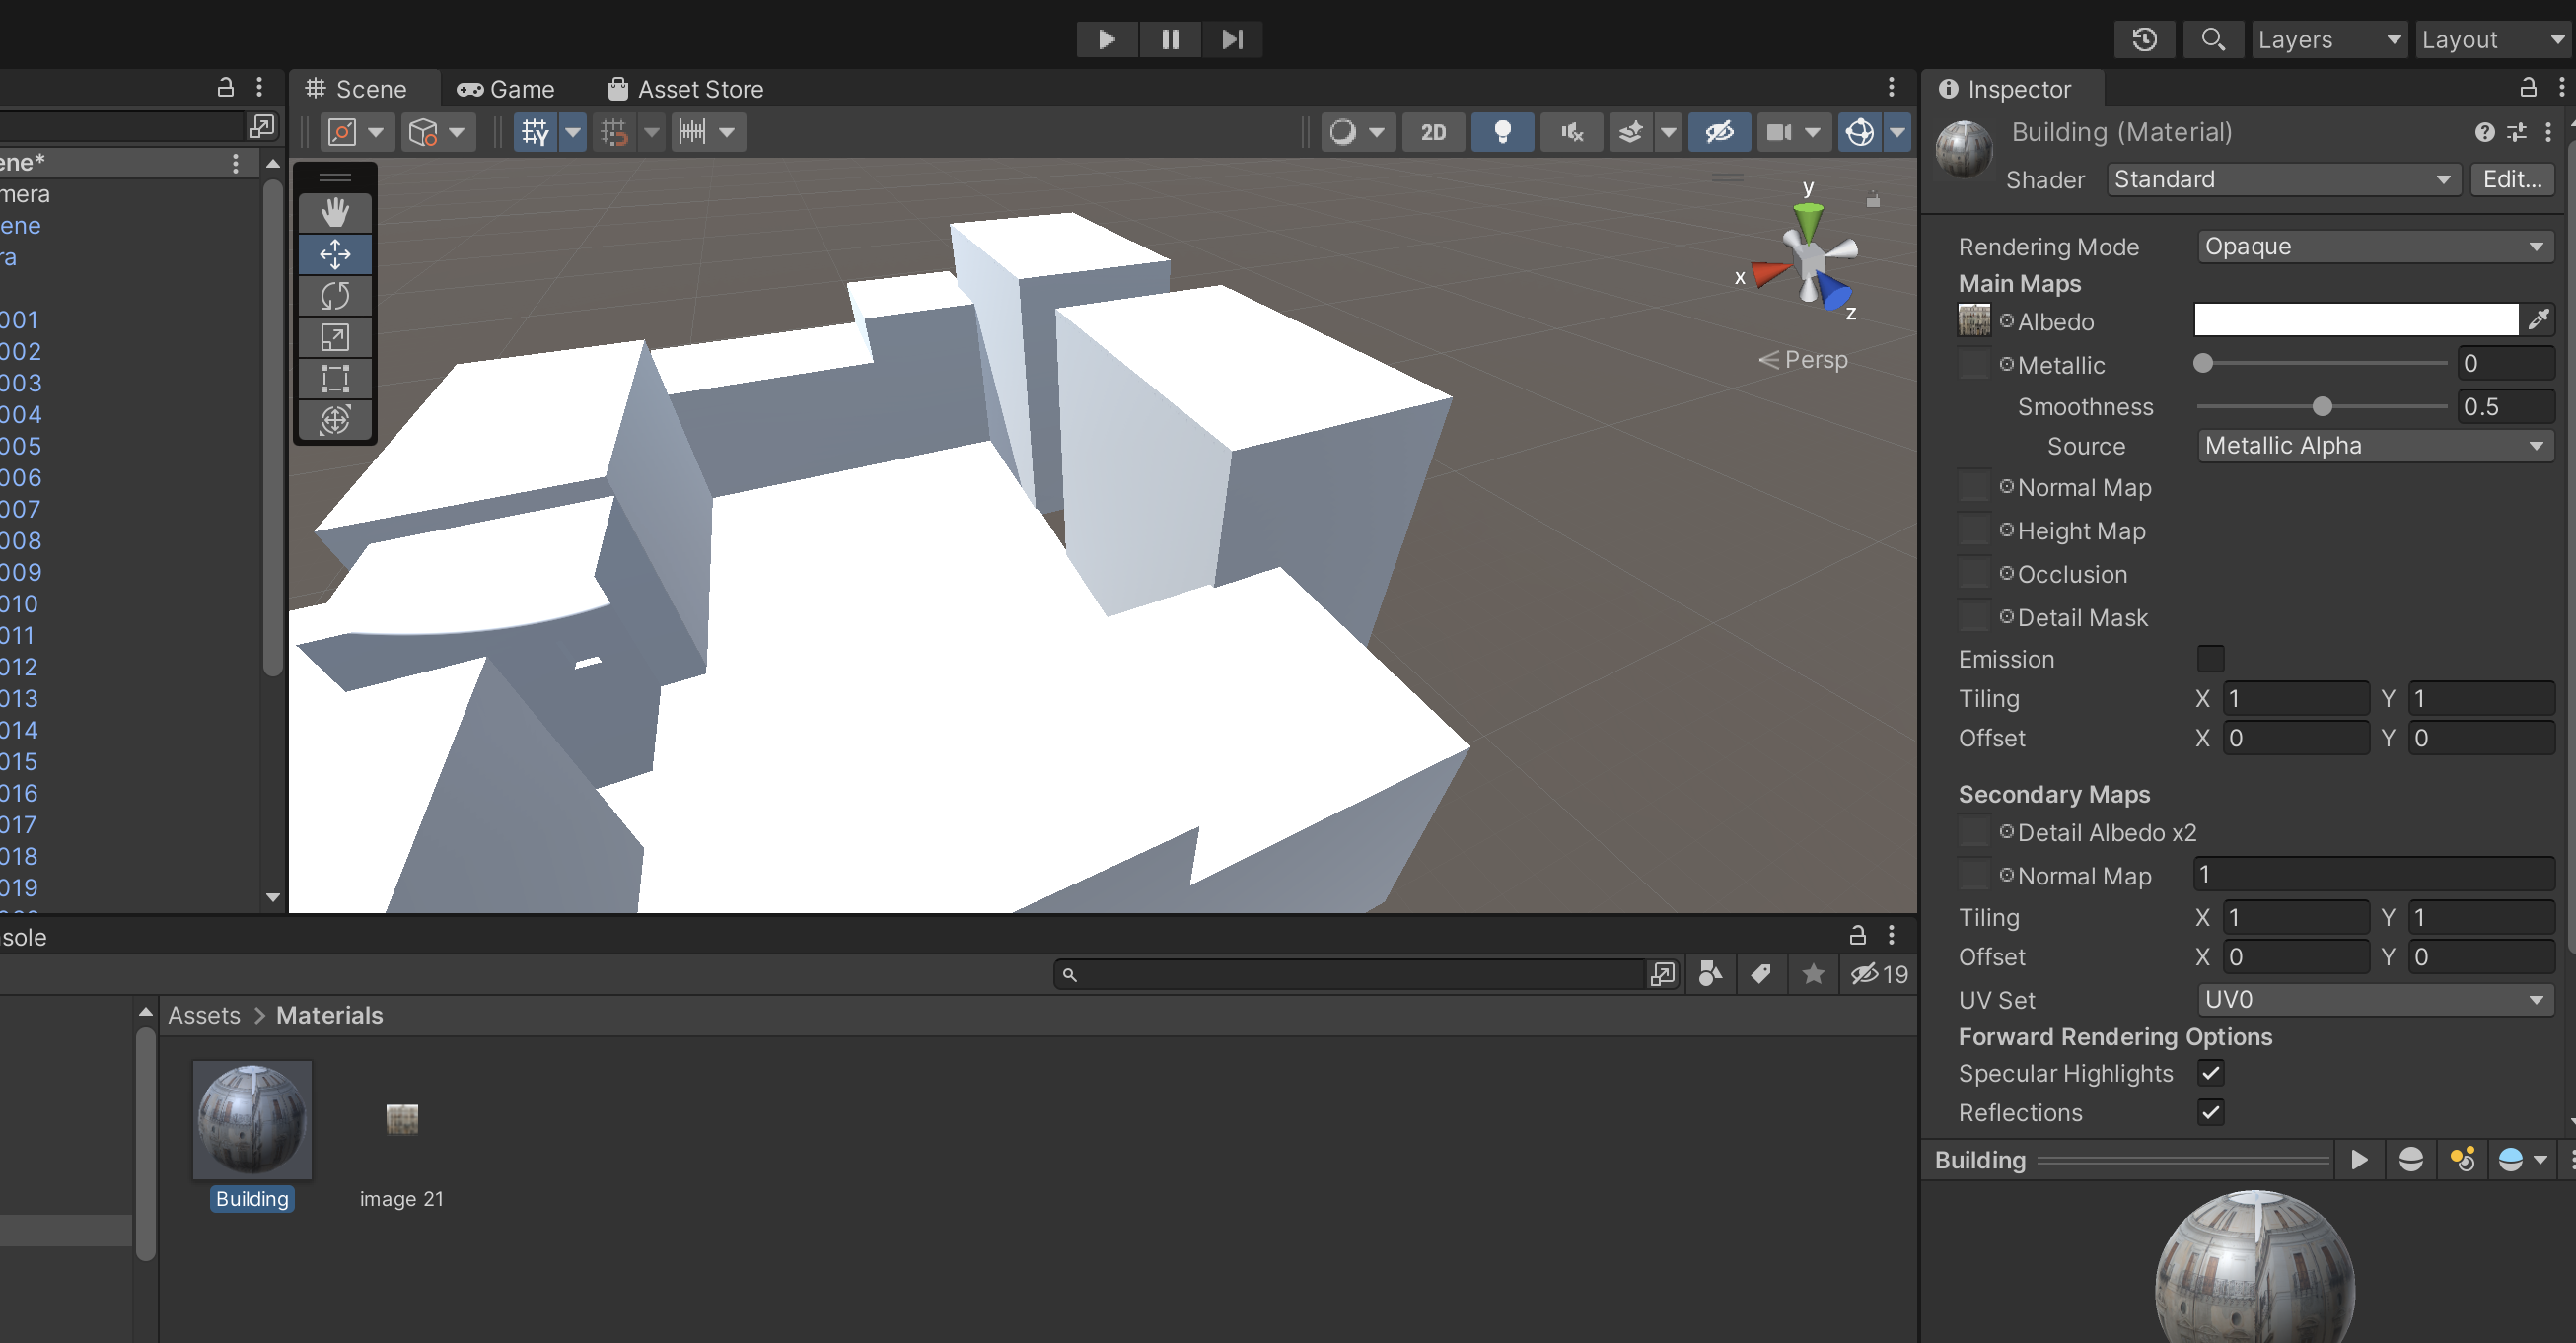
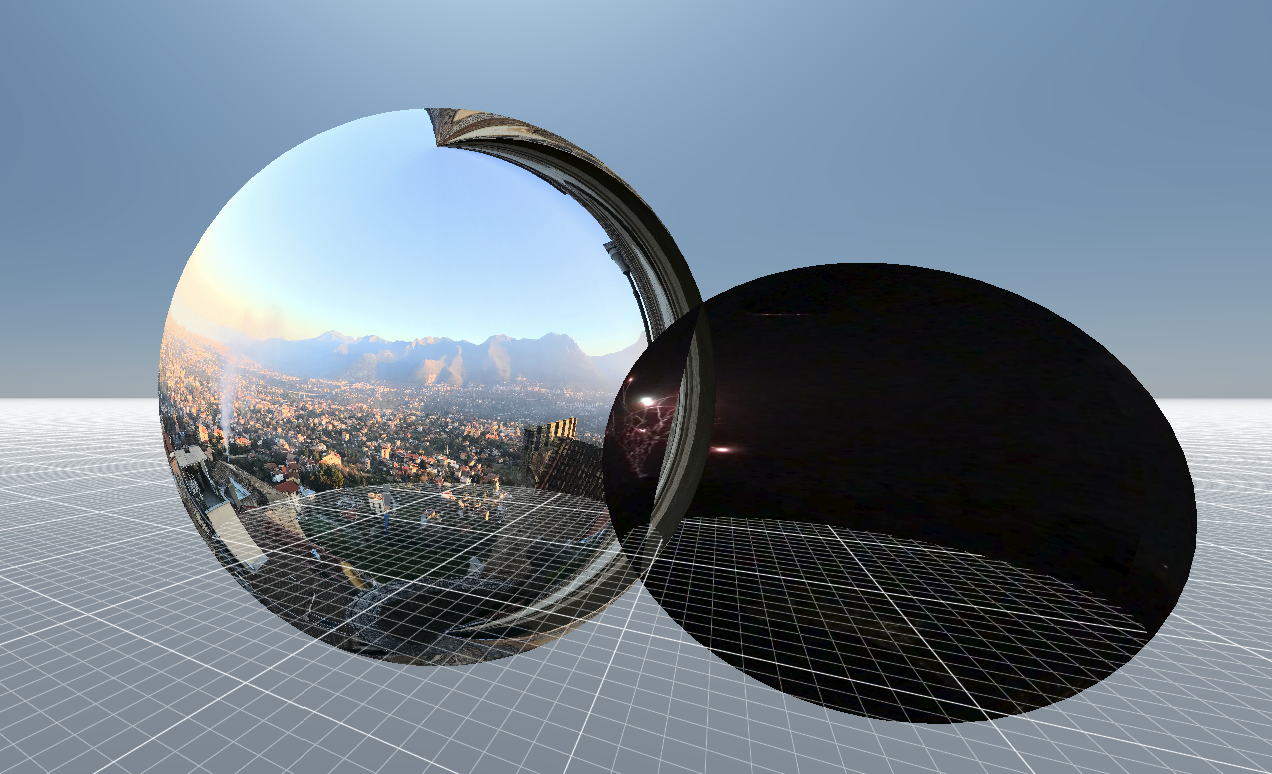
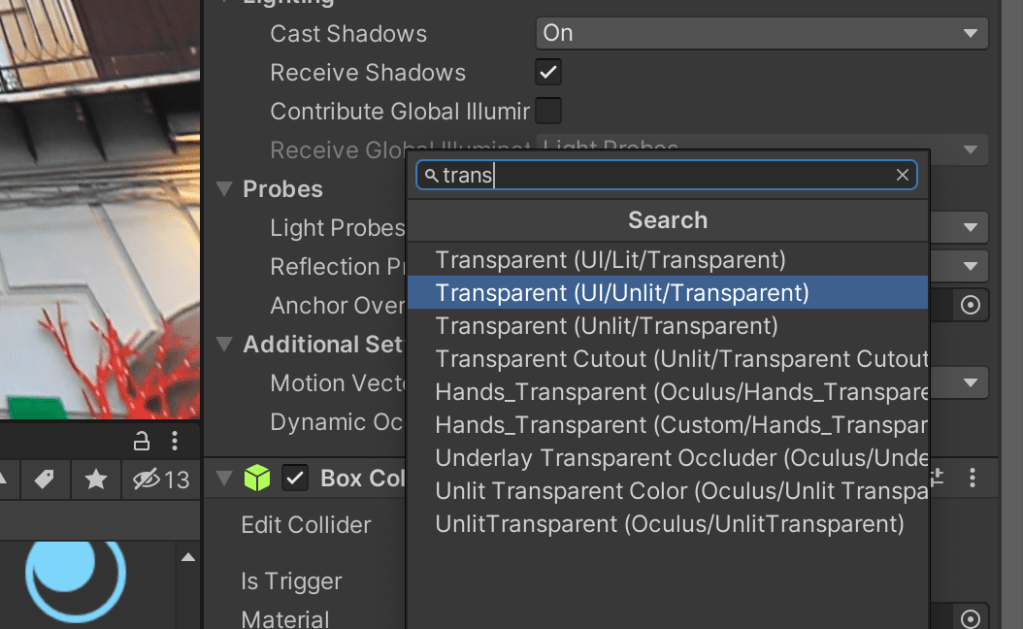
I found a way to change the background so it’s completely transparent (see below).

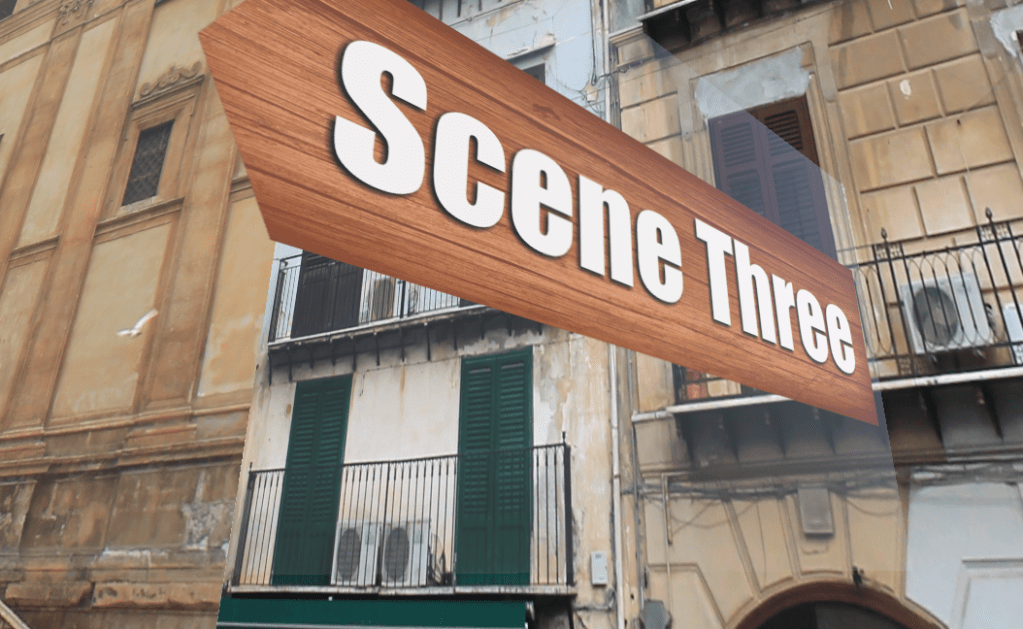
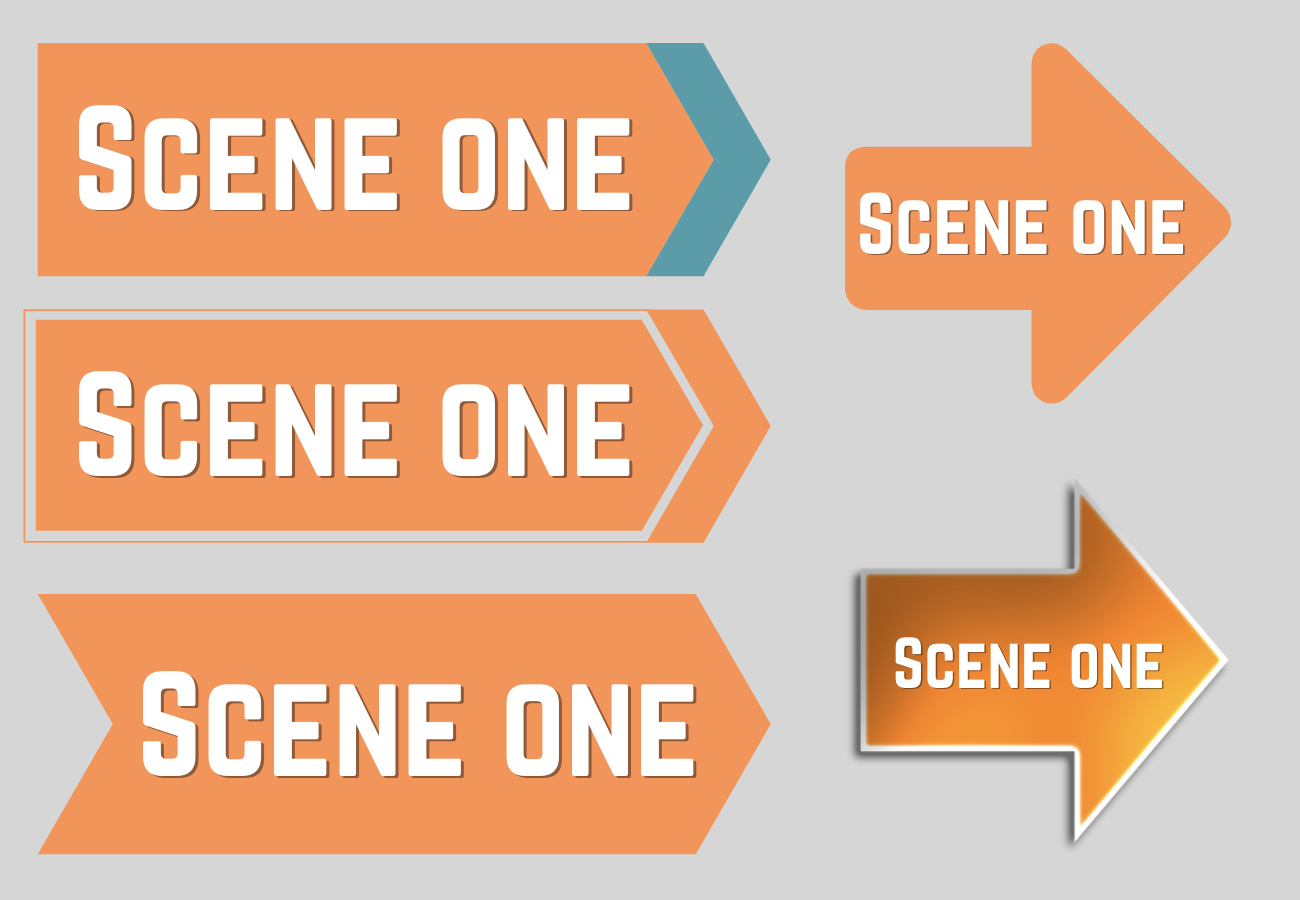
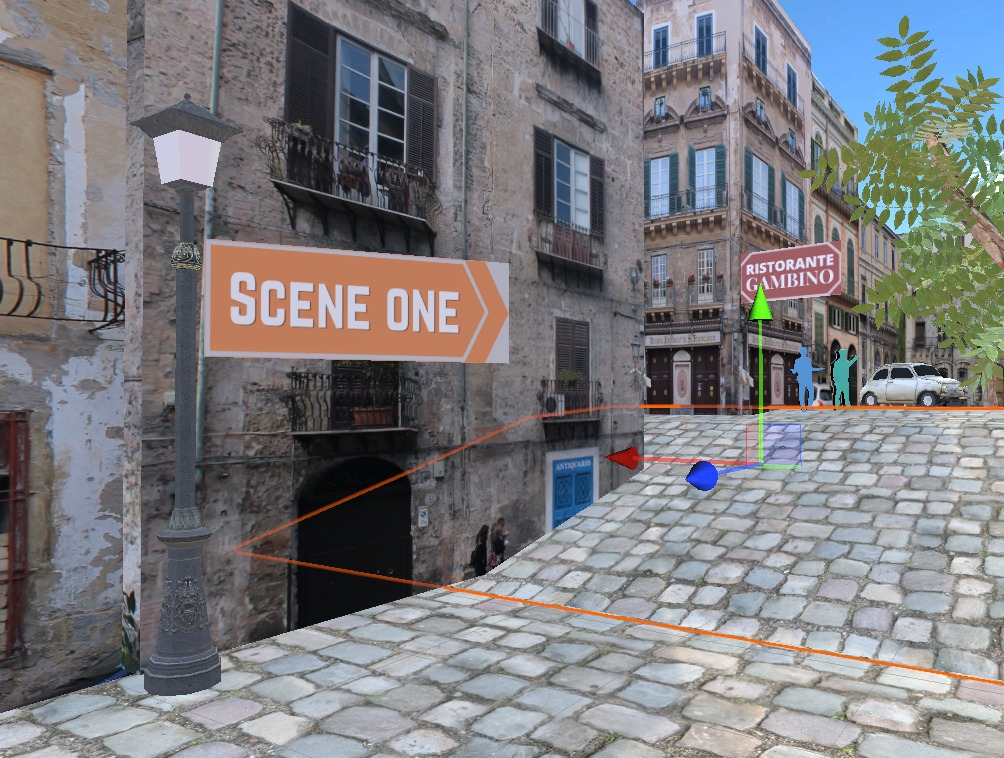
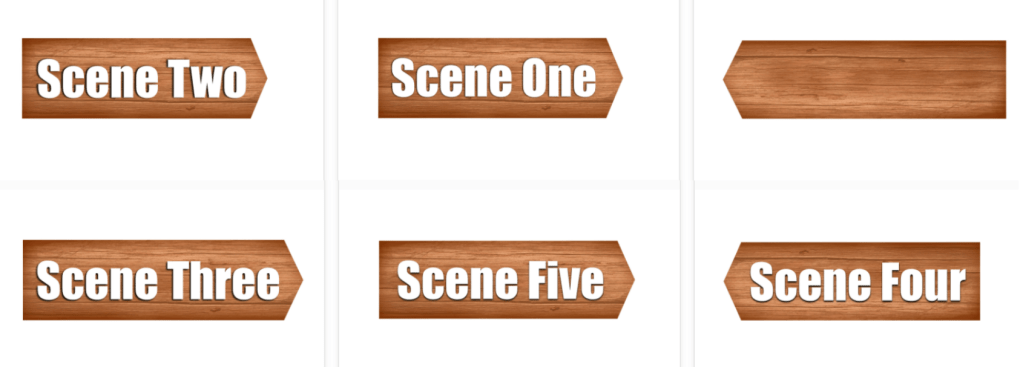
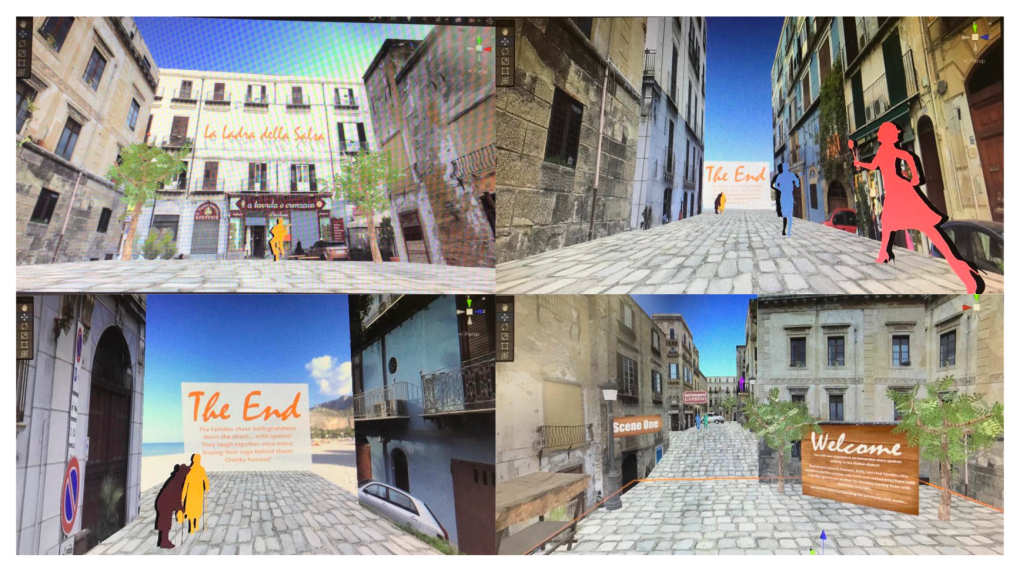
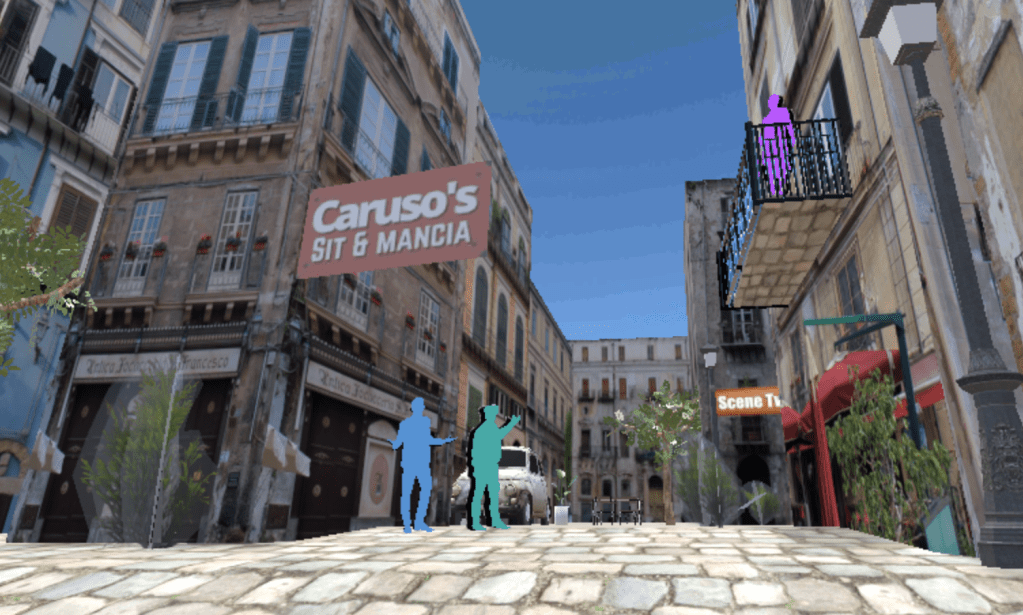
After changing the fonts and text positing slightly on the entrance and exit plaques, the information resulted in being much more legible (see below). I tried other fonts and styles but they didn’t work.

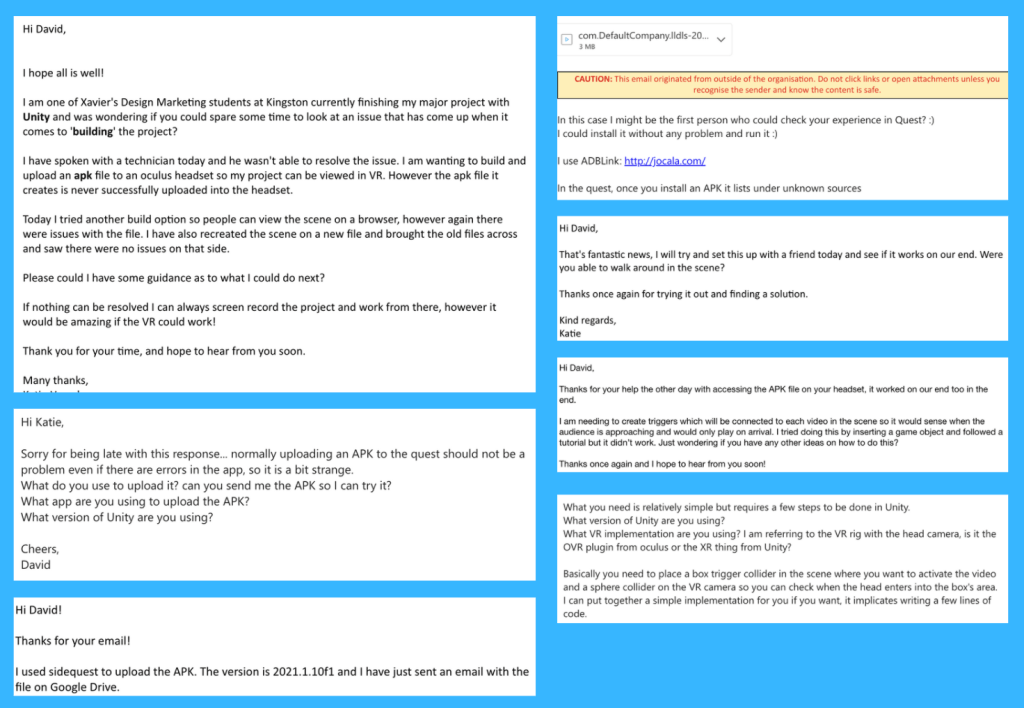
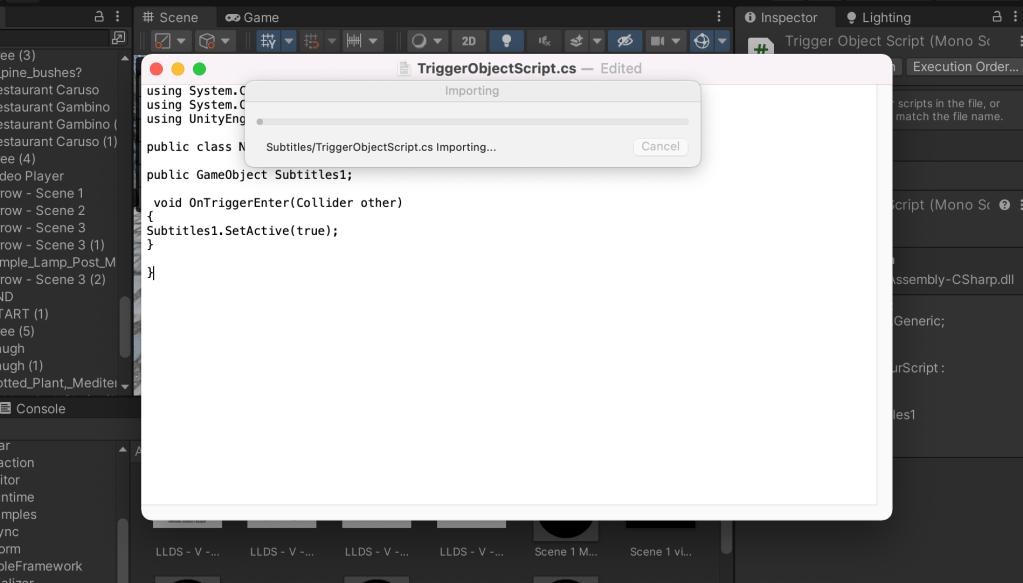
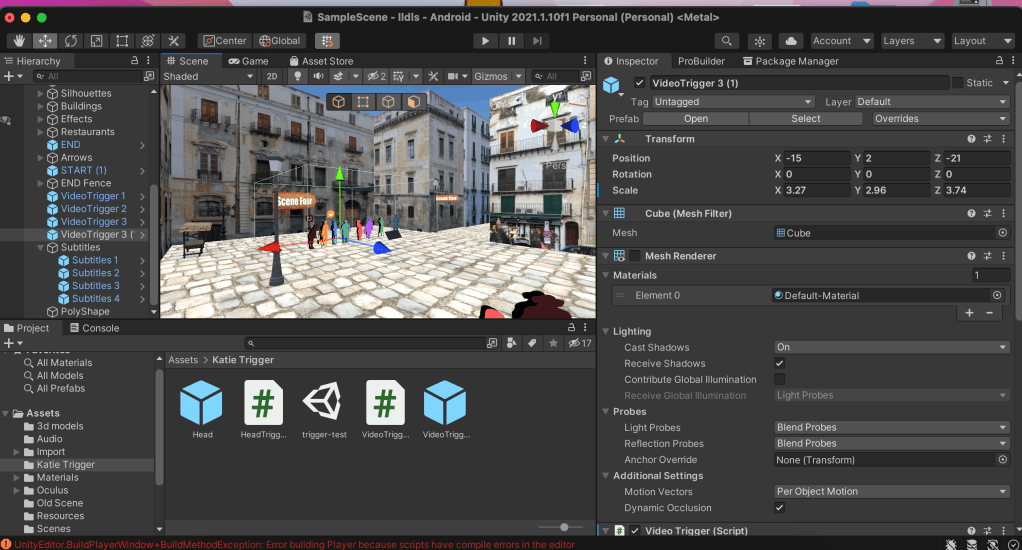
I then tried to insert a simple code David (Antiloop) created for me and made triggers around the videos along the scene, however it didn’t work. So I reached out to him again for help as this was going to make the videos only play once the viewer is nearby.

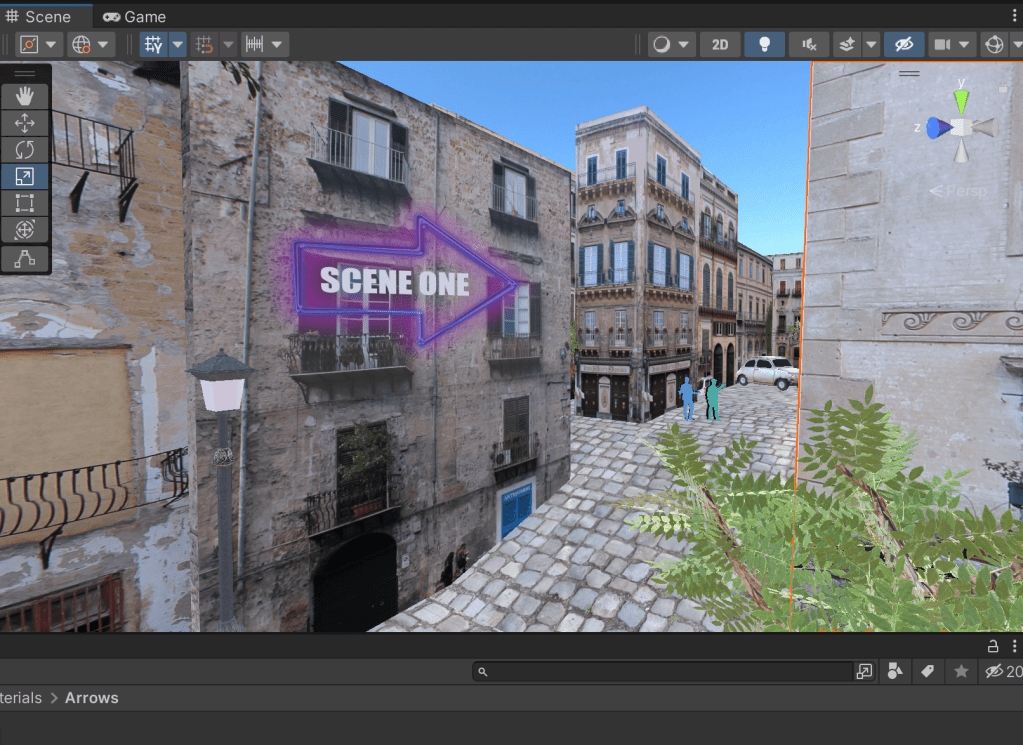
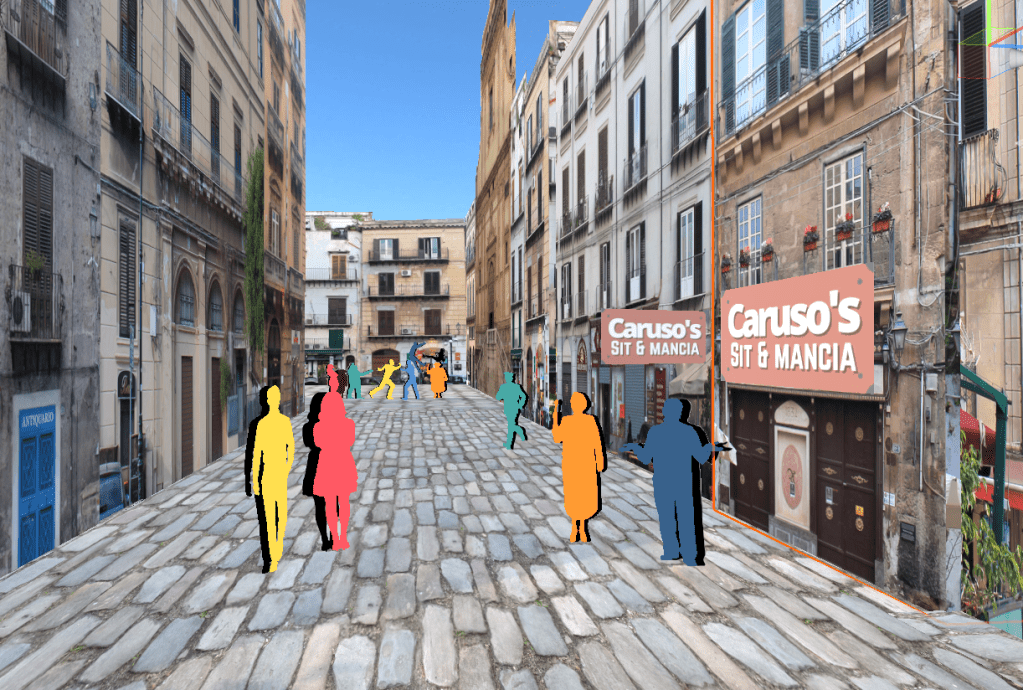
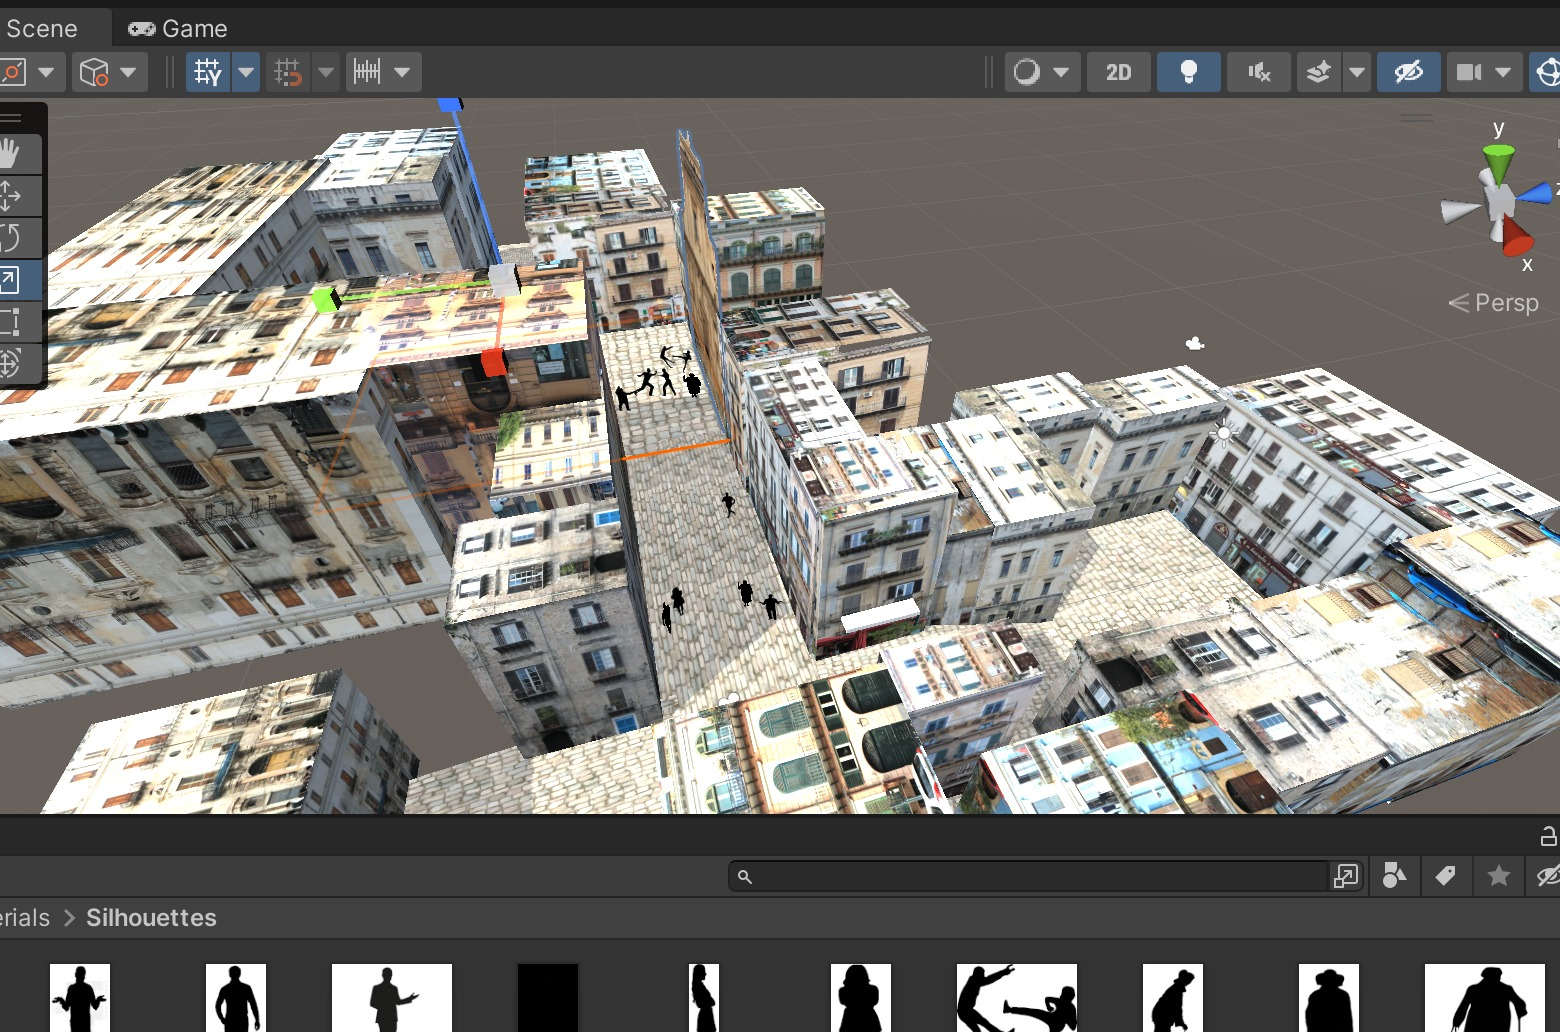
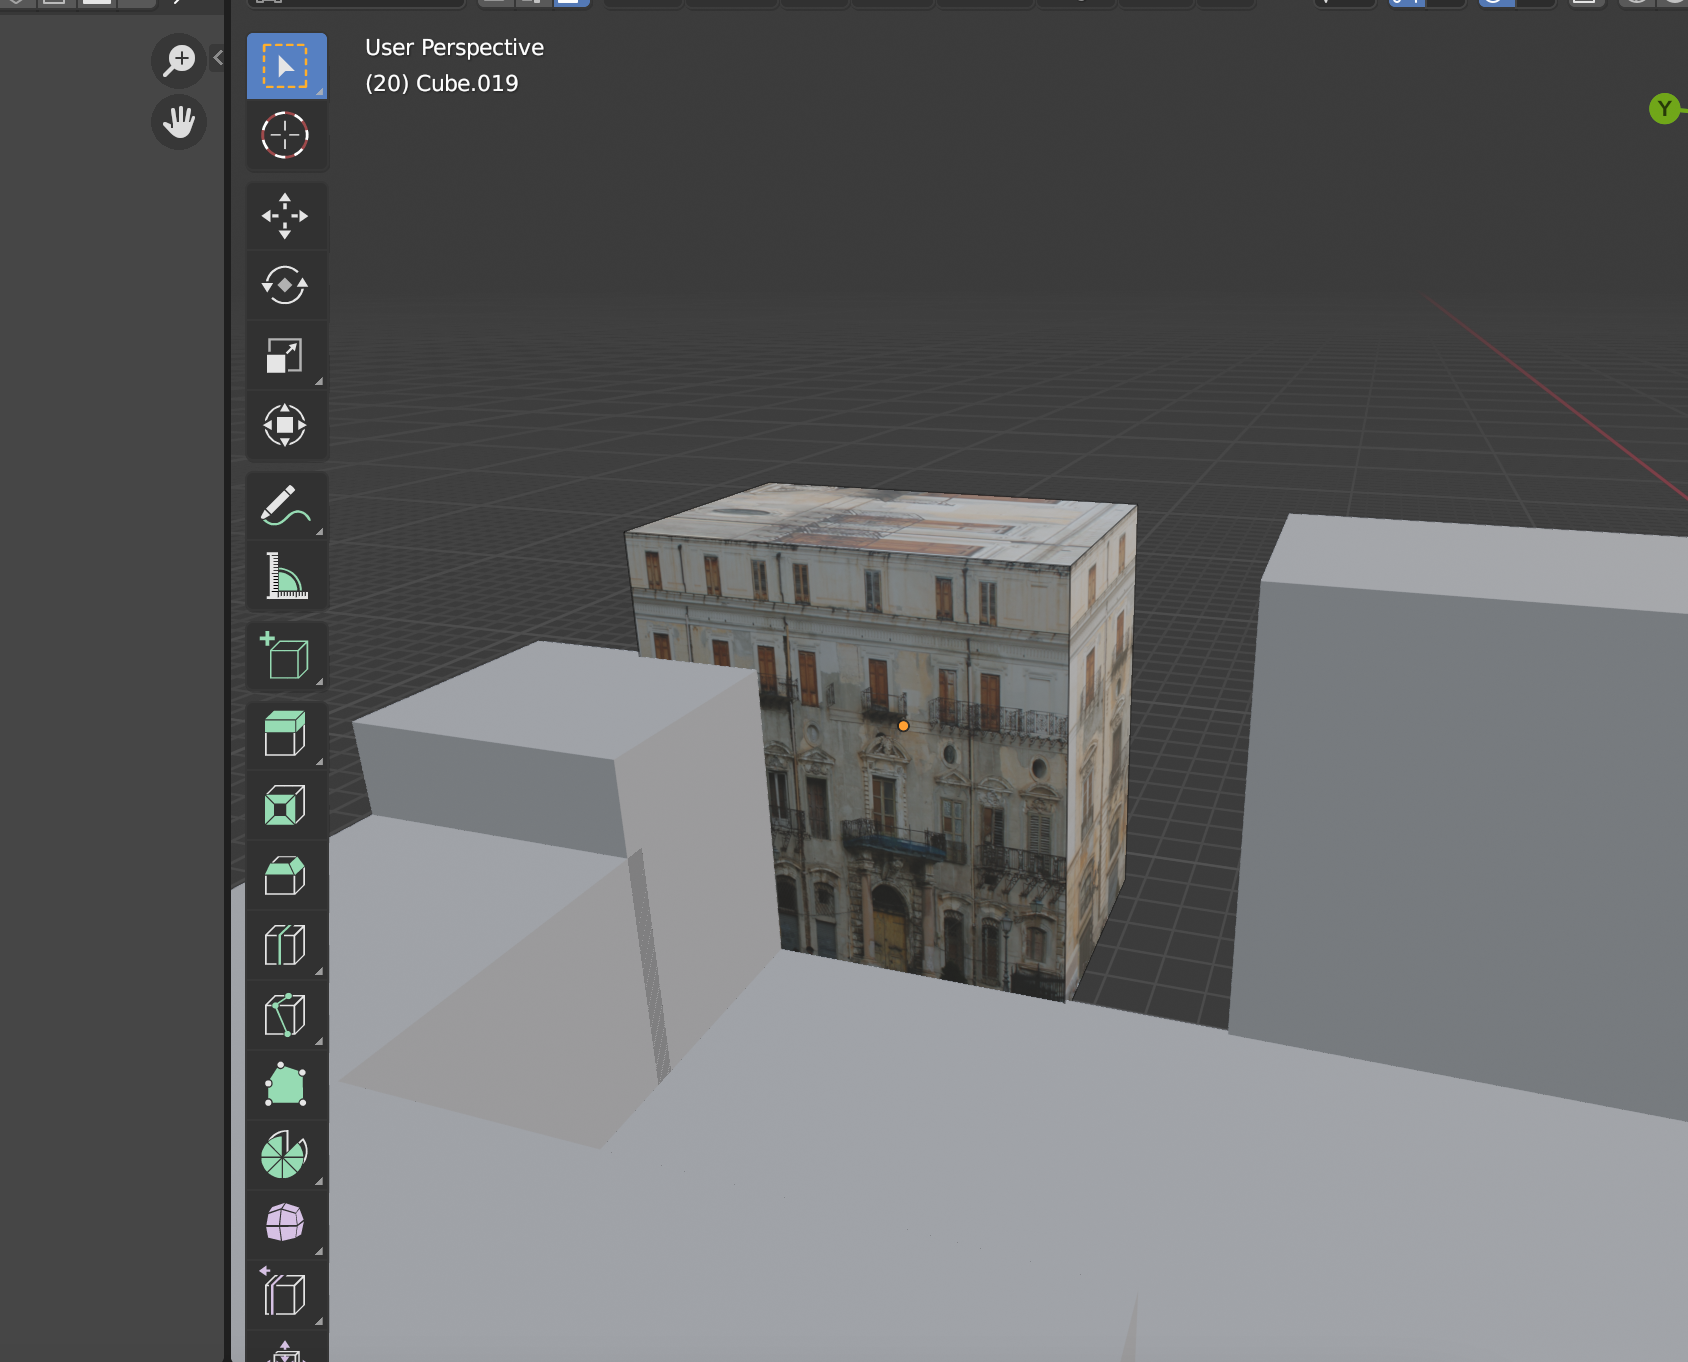
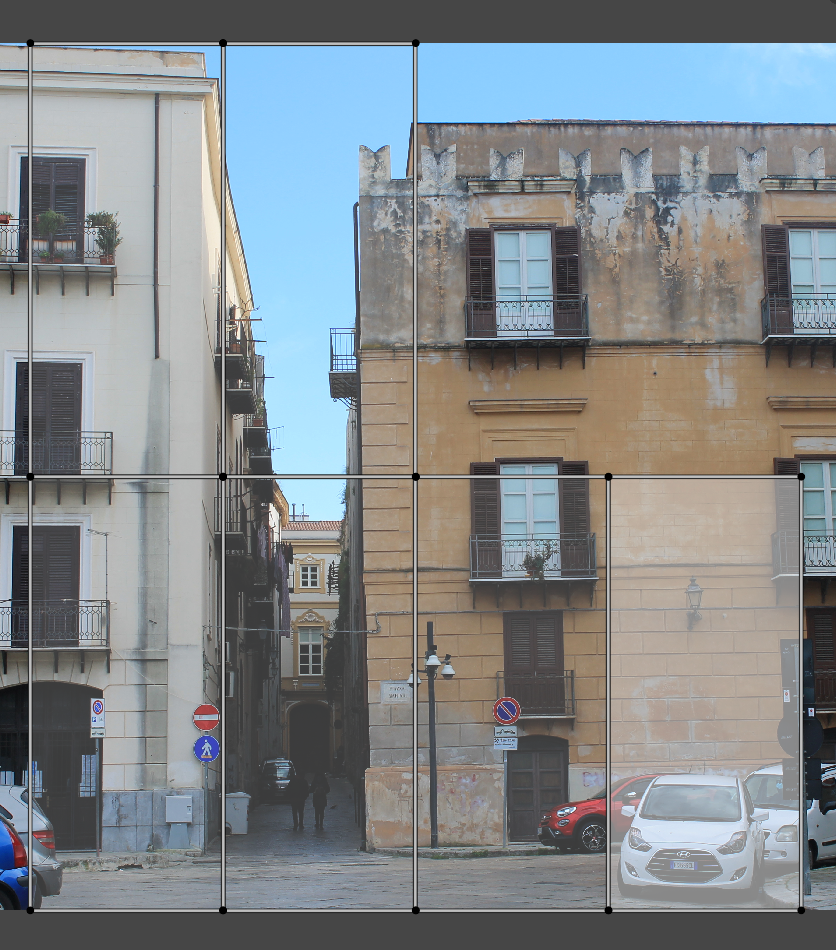
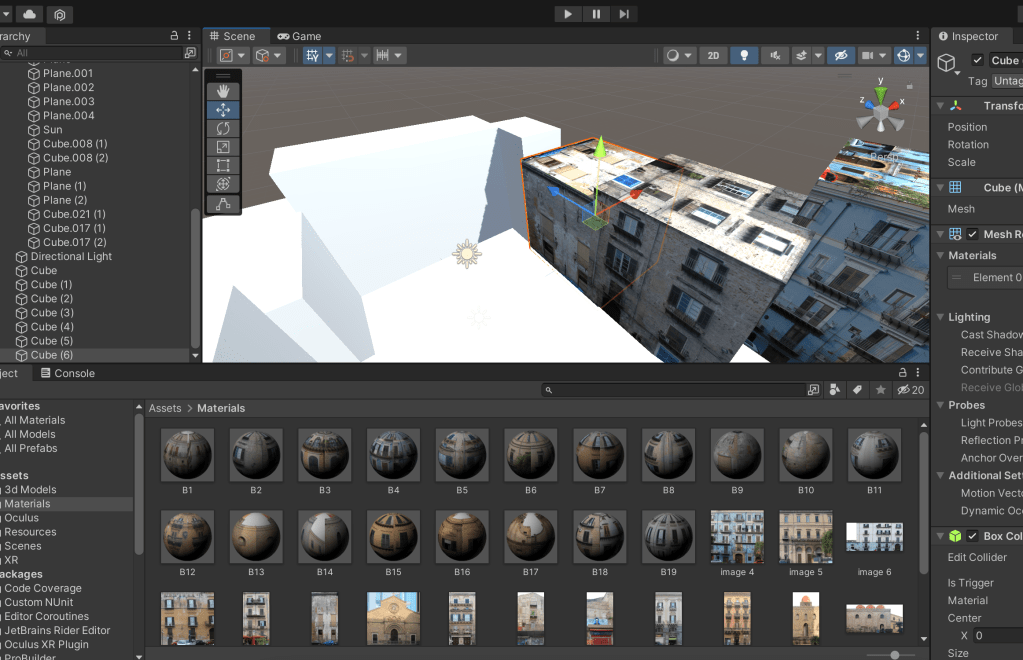
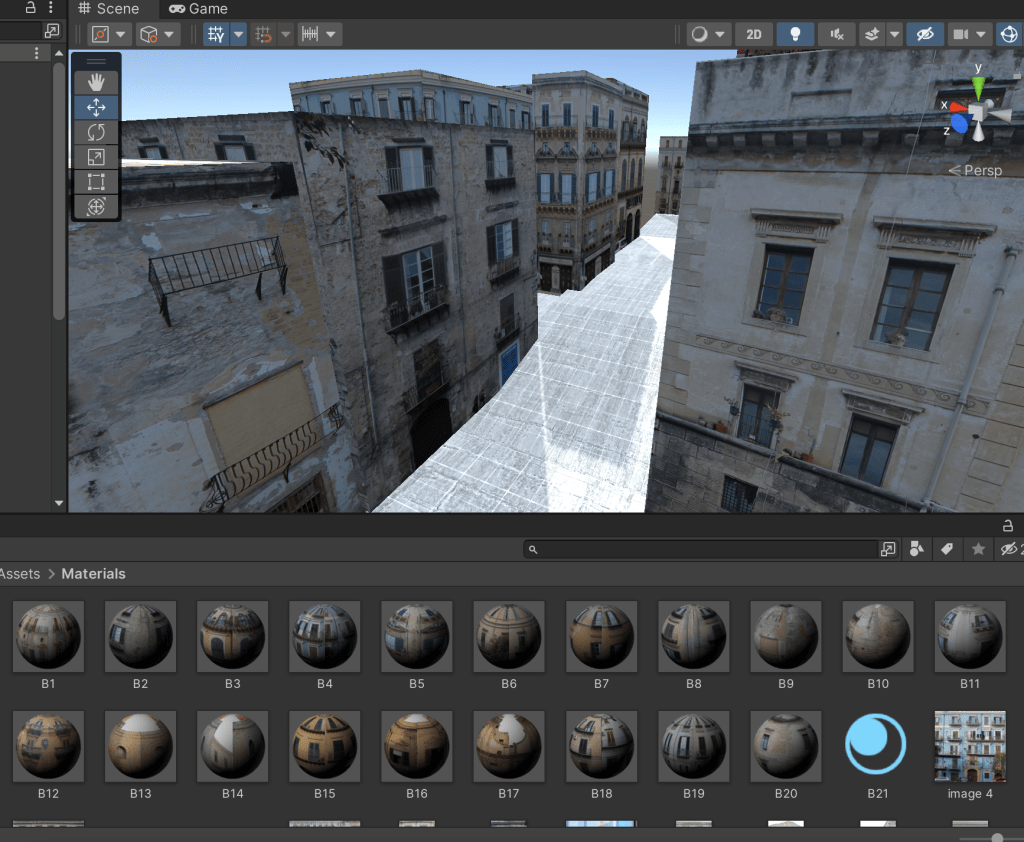
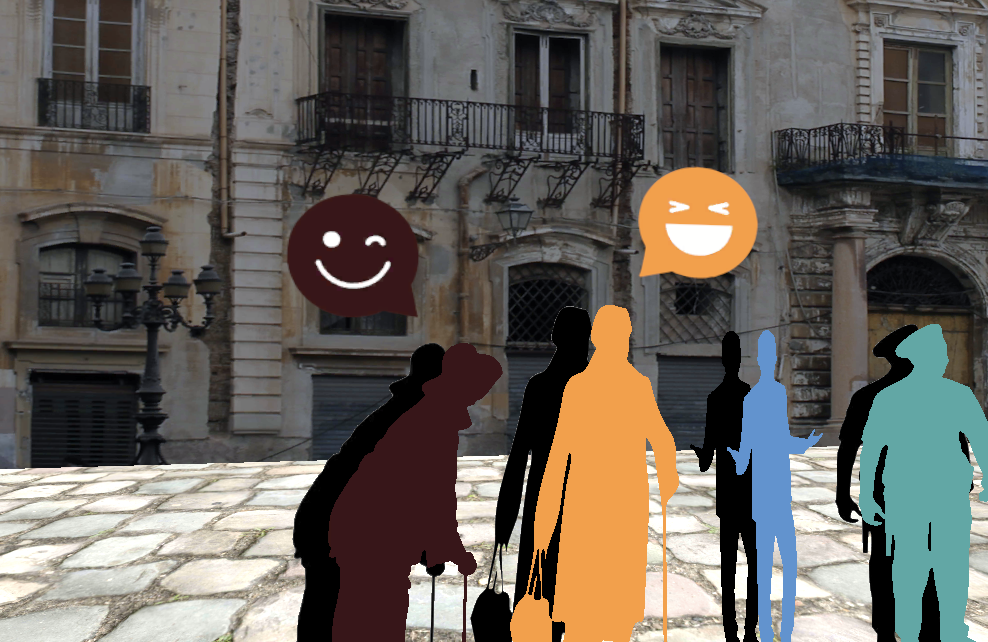
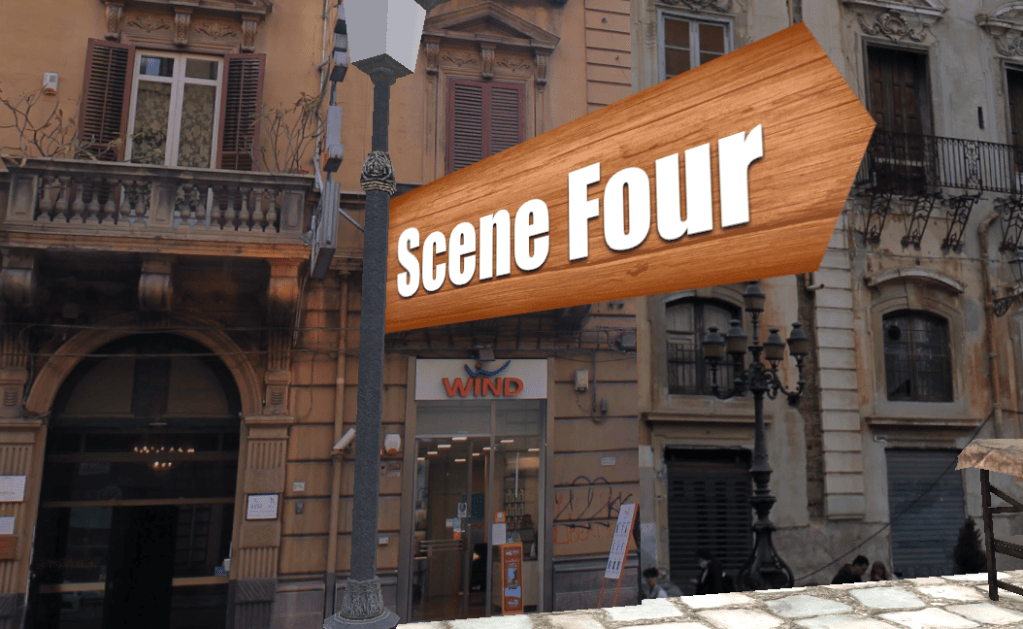
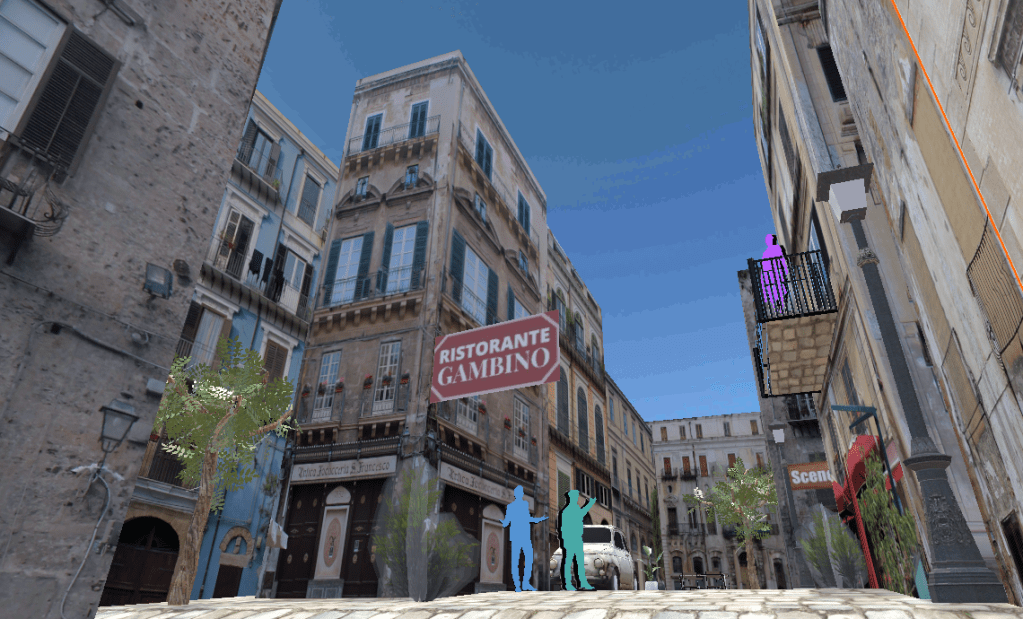
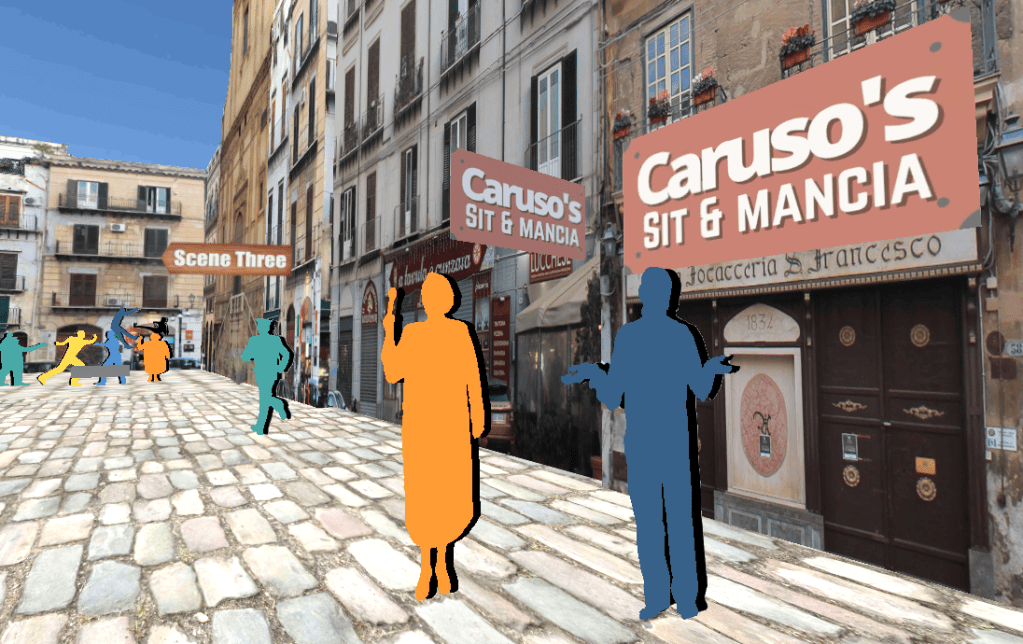
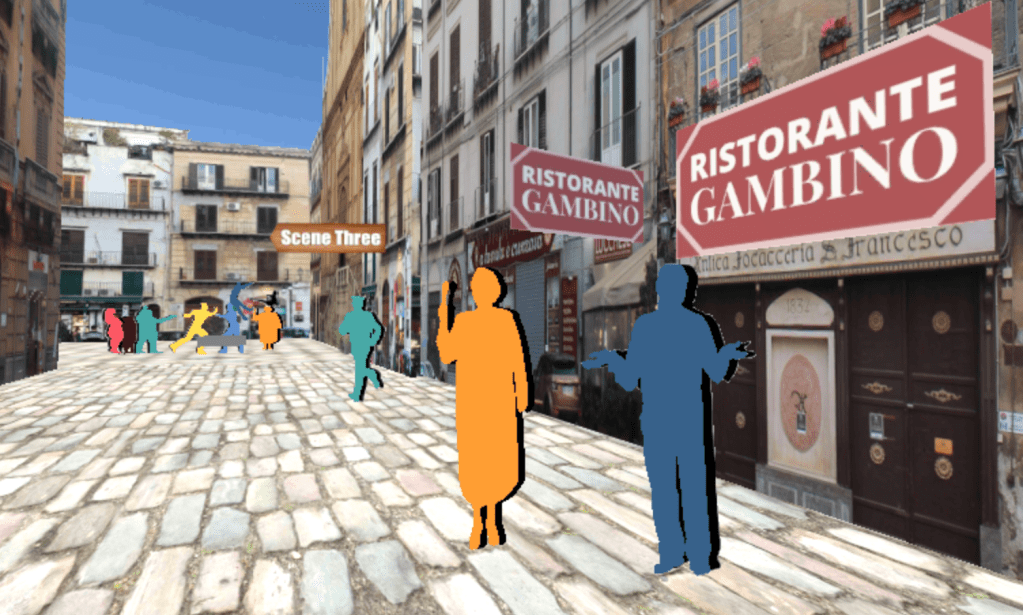
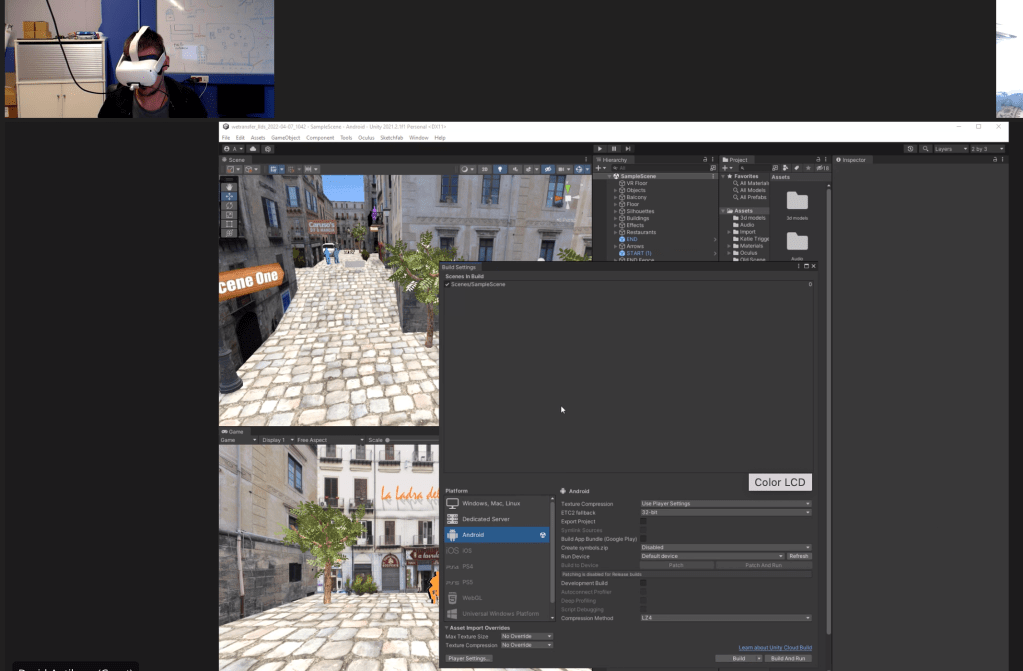
I noticed at this stage the restaurant signs were placed on the wrong buildings, so they were changed and corrected.

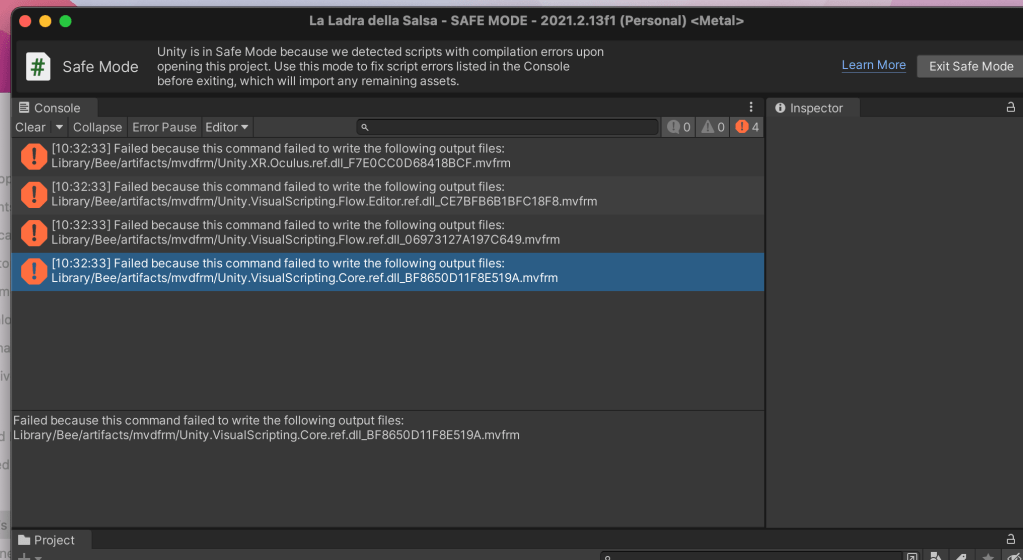
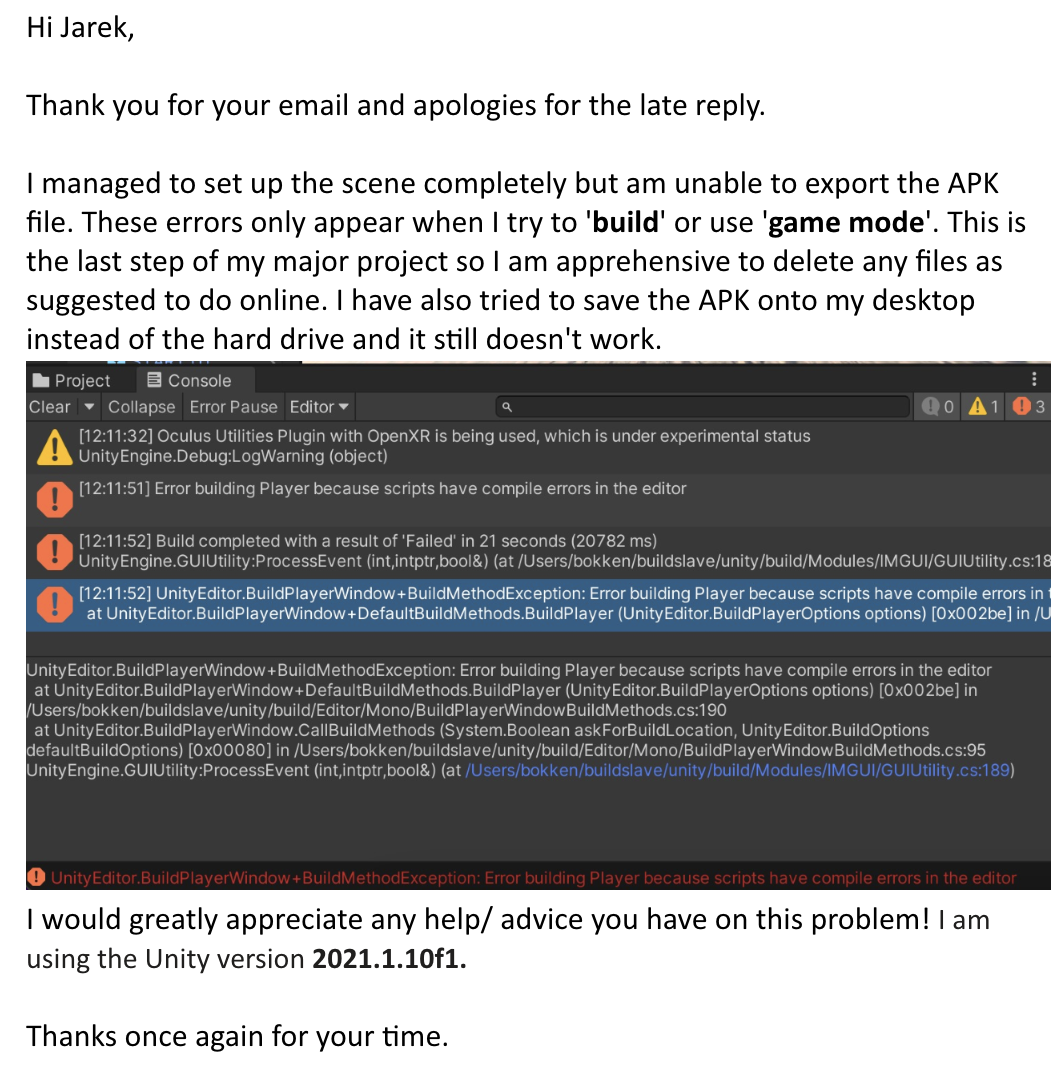
Further errors occurred on Unity where I couldn’t import the Oculus integration into the scene after many attempts.

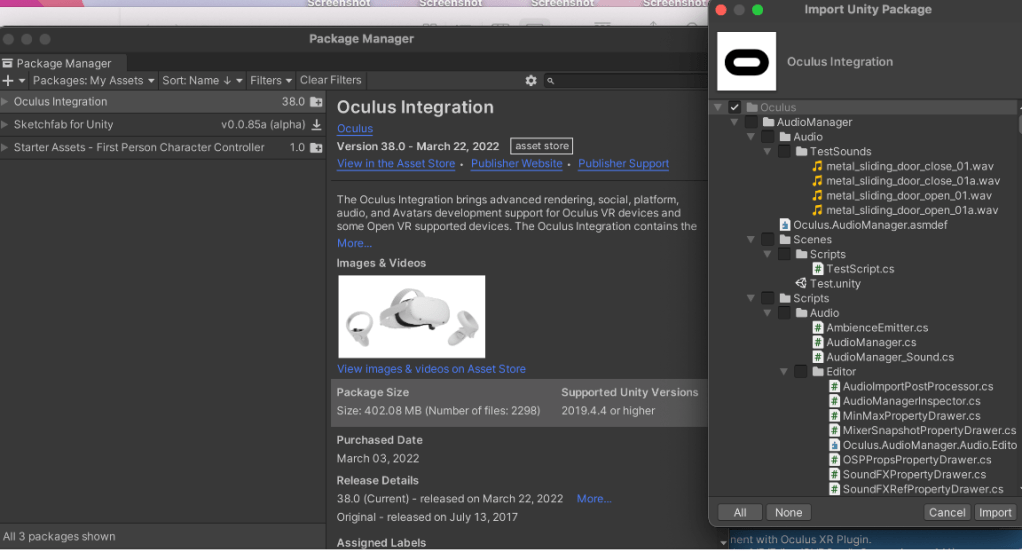
I managed to work with a friend on the errors, as David wasn’t responding, and we managed to insert the code and objects into the scene. However I couldn’t ‘build’ still as there were errors.

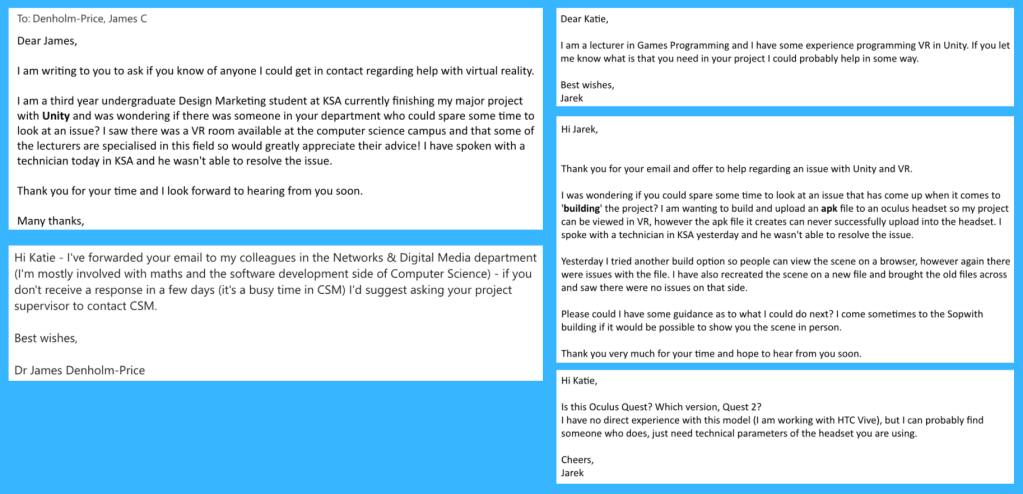
I contacted different departments again within the university all of the suggestions online didn’t work.

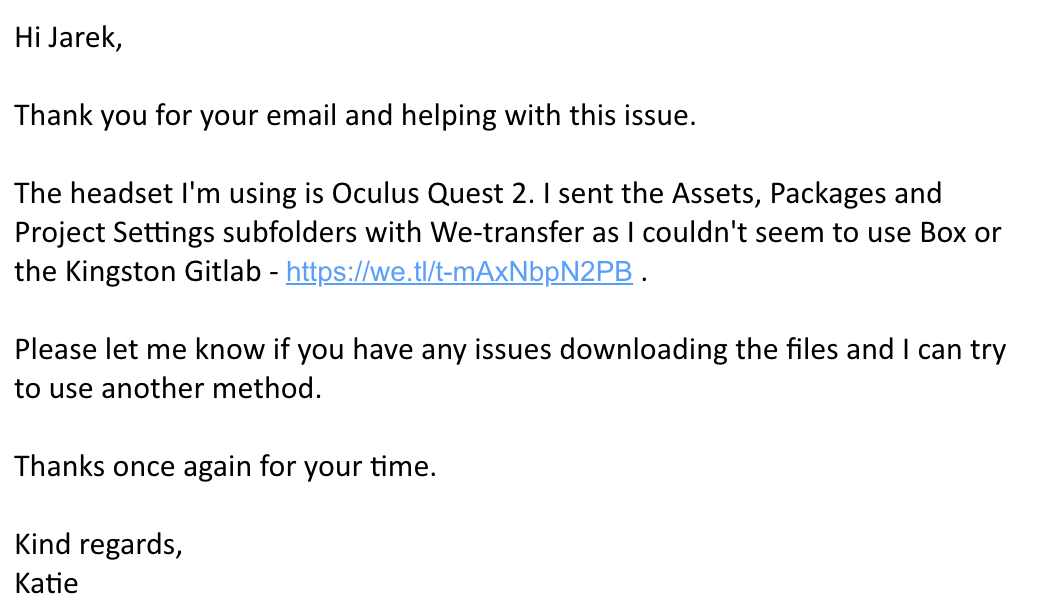
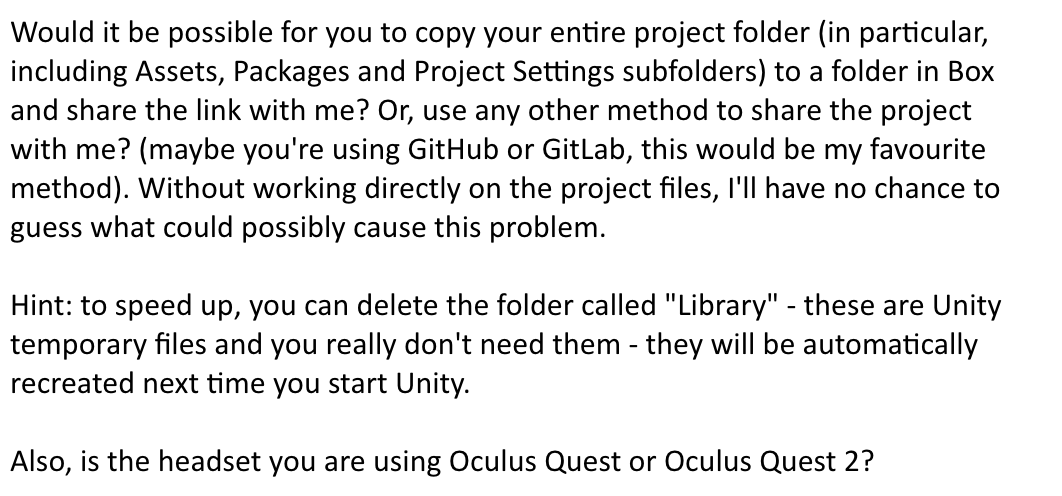
The communication continued and I transferred my files to him however he didn’t reply since then.

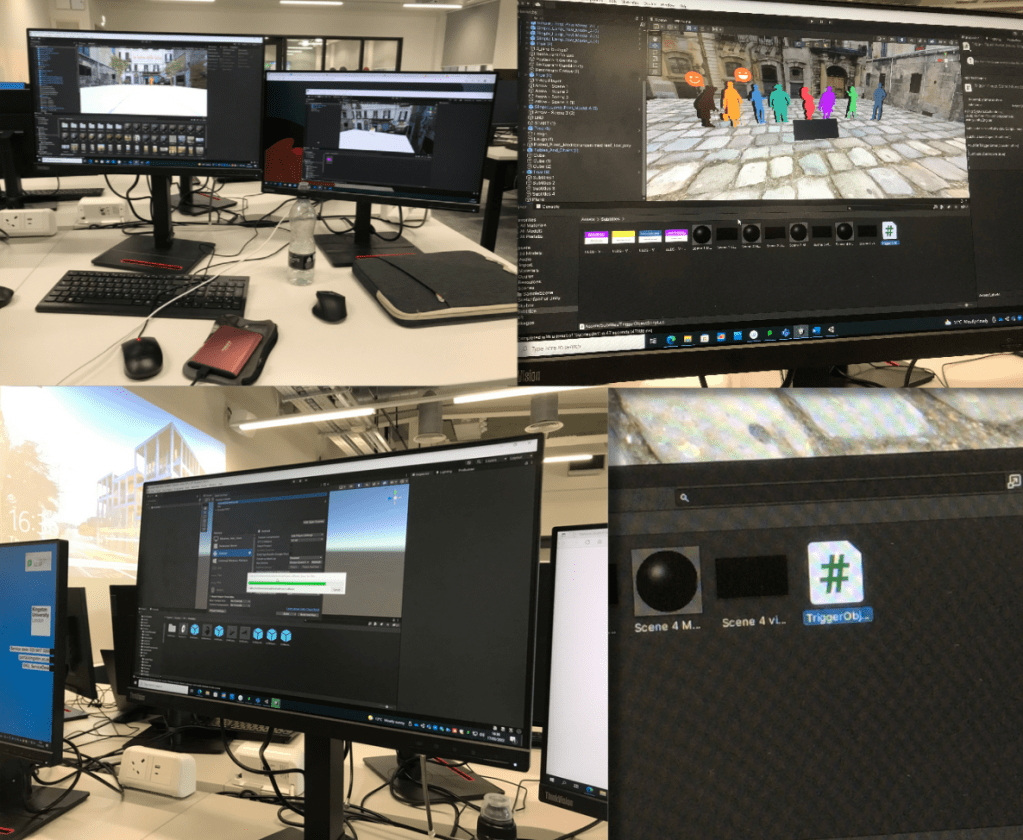
The following week I scheduled a meeting with David who kindly accepted to help with the Unity errors. On Teams, we found that the scene worked on his Unity version and he made some adjustments to the navigation and barriers. This was interesting to see as I was able to learn from the changes he made and saw what using Unity was like for someone with more experience.

The scene still wasn’t working by the end of the call, so he offered to try exporting the APK the following day. Unfortunately I didn’t hear from him for a week which put the project back slightly. In the meantime I worked on the submission PDFs and tried to resolve the issues myself. When he came back to me with the amended Unity files, they couldn’t be uploaded onto the Unity platform which meant I wasn’t able to make further changes to the scene. Luckily he exported the APK file from his computer which meant I was able to work on uploading it to the headset.

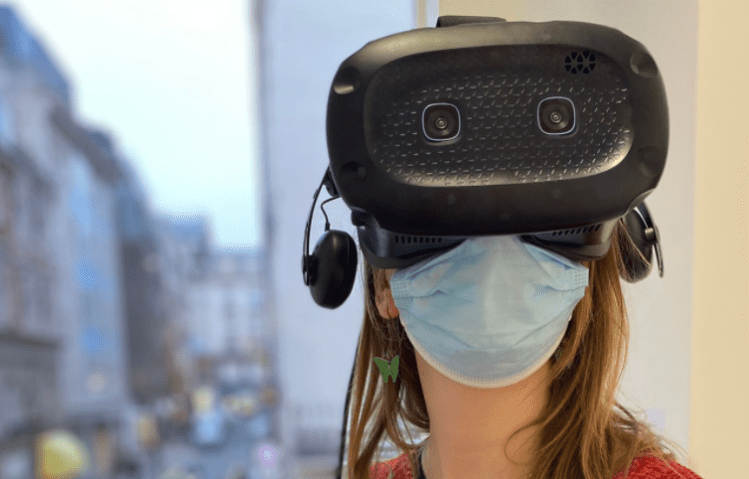
Uploading APK to Oculus Quest 2

I followed multiple tutorials to side-load the APK file to the Oculus Quest headset, however the video tutorial above was the easiest to follow. After spending a few hours setting up my Oculus account, re-booting the headset to log-in, installing Side Quest to my computer, uploading the APK file etc, I could finally access my scene onto the headset! This was a very rewarding moment as I was able to record my experience walking through the scene in VR, and finally move around the place I created from scratch on Unity!

Short Reflection

This project has been very rewarding to work on and I have thoroughly enjoyed each step of the experience. Despite having many technical challenges, I learnt a lot of new problem solving skills along the way! The skills I have gained across platforms such as Unity, Premiere Pro, Blender, Photoshop, Side Quest and more, have enabled me to create a fully-functioning game in virtual reality from scratch! The practical development behind the scene was also an eye-opening experience, such as; story-building, writing a script, recording voice actors, taking photos in the city, recording audio samples etc.

In the future I look forward to growing and learning more as a creative, pushing limits we place on ourselves to create experiences like this that test and change the way we see the world.

To access the APK, please open this link – https://drive.google.com/file/d/1EPGUmFp5l_LG4Myu_-tPaAClUReNOj66/view?usp=sharing

Week Eleven

Unity Scene Transfer – Problem Managing

After spending 6 hours trying to reinstall Unity onto my laptop, I decided to try and to the scene transfer on the PC’s at the university. I ended up transferring scene very quickly, but what took the most time was moving each object over as a preface and then finding the correct shapes/ materials to match them with.

While I was sorting through the old scene I found the faulty code I was working on previously. With a friends help, we spent almost a whole day trying to get the VR to work but it didn’t. Before creating this new scene, we added a basic scene to the file and added the VR elements and it worked so we were very confused at this stage. As a result of this, I booked an appointment in with a technician to get some help with the scene.

Just incase the scene was facing further errors, I went to the science computer lab to record the scene in editor mode so I would have something if it did crash again. I tried to set up my scene on the Macs on campus, however the unity version couldn’t be installed on any of the computers. I couldn’t screen record on some of the PC’s due to their very low quality recording. I ended up screen recording the old version of scene to edit on Premiere Pro as it had better quality lighting. I edited video and added audio and subtitles.

Eventually I spoke with a technician about the project in person but he didn’t know how to resolve problem. The advice he did give was to try and have it accessible on a desktop ‘WebGL‘ instead of VR, but that wasn’t what I was aiming for.

I then reached out for help from my lecturers, David (Antiloop) and other lecturers from other departments in the university. The only person in the end who helped was David who suggested alternative ways of solving the issue. My friend managed to delete some of the folders from the file and it worked on the VR headset. The spawn size was bigger than it should have been and all of the audio played at the same time but the scene was finally working. The email communication is shown below.

Other contacts interacted with

VR ProBuilder Learning

I created an invisible base barrier for the new scene with ProBuilder so that the audience couldn’t go into certain areas of the scene. This worked perfectly and I was keen to try it out in VR.

References:
IOS https://docs.unity3d.com/Manual/UnityCloudBuildiOS.html 
WebGL https://docs.unity3d.com/Manual/class-PlayerSettingsWebGL.html

Email Marketing and Unity LinkedIn Courses

Finished course Email Marketing: Strategy and Optimization and Unity 3D 2021 Essential Training.

Week Ten

Grandmas Giggling (Laughing Bubbles)

In scene four, the Grandmas are laughing together so I wanted to show this in the physical scene. Unfortunately, I didn’t have enough time to animate the characters so I decided to add expressive laughing bubbles next to the characters in the scene. This received positive feedback in the group review. I found the expressions online and vectorised them with illustrator and added them to the scene on a transparent plane.

References:
Giggle speech bubble – https://www.google.com/url?sa=i&url=https%3A%2F%2Fwww.dreamstime.com%2Fillustration%2Flaugh-speech-bubble.html&psig=AOvVaw1afPLK_rSq1QX3iE97dcBd&ust=1647358208412000&source=images&cd=vfe&ved=0CAwQjhxqFwoTCPjqgd71xfYCFQAAAAAdAAAAABAD

Customer Journey – Arrow Signs

In order to help guide the audience through the scenes, I added arrow signs along the journey. I initially tried glowing arrows in purple (above) but it didn’t fit the scene. Then I tried orange arrows (below) but again, the colours were too bold against the rest of the scene.

I then experimented on Photoshop with adding wooden backgrounds to the signs and made different versions facing both directions. This aesthetic was much more aligned with the rest of the scene.

References:
Arrow not used – https://www.freeiconspng.com/downloadimg/7594

Restaurant Signs

Creating the restaurant signs was one of my favourite parts of the scene as I was able to play with my knowledge of the Sicilian language and the names. When I was in Sicily for the project, a friend and I came across a name of a restaurant ‘Sit & Mancia‘ which was a very funny name as it played with the word ‘assittati’ which means sit down in Sicilian and the word ‘sit’ in english. I wanted to use this in the scene as it will bring a hidden humour to the scene that one Sicilian speaking people will understand.

Once the signs were ready, I played them on planes ‘plane’ game objects within the scene. The end result was very pleasing and other people said the same during future review sessions.

References:
Carusos inspired sign post- https://www.pinterest.co.uk/pin/86694361556164311/

Entrance and Exit Scene

Following on from the sign-posts, I created and added title, entrance and exit plaques to the scene. The title was initially mocked-up on photoshop (above) to get an idea of what would look the best for the scene. After asking for external opinions, I decided edit title on photoshop and remove the windows behind it to make it legible for the viewer.

Then I used the text below to create plaques to introduce the audience to the scene and to end the story. The fonts I used were Candara and Mistral.

Text for Scenes

Entrance
You will now experience an immersive story spoken entirely in the Sicilian dialect.
Rooted and raised in Palermo, Sicily, two rival families (the Gambinos and the Carusos, who both own restaurants) have held a grudge against one another for decades, leaving them with bitterness and rage.
Unravel the story by following the arrows to each scene…

Ending
The families chase both grandmas down the street… with spoons! They laugh together once more, leaving their rage behind them! Cheeky Nonnas!

Adding Audio

Entrance and finishing scene audios added following section of LinkedIn tutorial ‘Unity 3D 2021 Essential Training’, ‘Adding Audio’

References:
https://www.linkedin.com/learning/unity-3d-2021-essential-training/adding-ambient-sound?autoplay=true&resume=false&u=56743409
Entrance and finishing scene audios added following section of LinkedIn tutorial ‘Unity 3D 2021 Essential Training’, ‘Adding Audio’ https://www.linkedin.com/learning/unity-3d-2021-essential-training/adding-ambient-sound?autoplay=true&resume=false&u=56743409

Creating Smoke: Fight Scene

I wanted to make the fight scene more dynamic by adding smoke, so I followed a Unity tutorial and managed to create moving floating particles for the scene. This brought a different dynamic to the experience and made the fight come alive!

References:
Smoke PNG used – https://www.pngegg.com/en/png-dkkie/download
Youtube Tutorial followed – https://www.youtube.com/watch?v=jQivfs34Wb0 Very clear and simple to follow

Challenge with MP4 Upload to Unity

At this point, I wasn’t able to insert videos into Unity on Mac so I tried to on gaming computers. This still didn’t work so I asked communities on Discord, Reddit, Whatsapp groups and lecturer for help:

Hey guys! I can’t seem to add MP4’s to a 3D unity scene on my Mac! Does anyone know of any useful tutorials for Macs, I’ve watched the YouTube ones with no success. Thanks

Luckily a technician came back with some advice on the matter and I tried out the different methods he sent. I managed to figure out how to insert the videos as a videoplayer material onto a plane and I could hear them playing on the game mode. All of the audios started to play at once so I looked into creating a trigger for the scene. I followed a tutorial for creating triggers and inserted the coding into the scene. The trigger coding didn’t work and it crashed my scene.

The code for the video triggers

I created a transparent game object and inserted the code into it but it didn’t work. This then crashed the scene so I ended up deleting the game object to avoid complications.

Above you can see how the scene looked with the subtitle videos inserted. They only worked when I pressed the Game Mode, however the audios still were playing at once so I needed to change that.

References:
Tutorials tried but didn’t work:
https://www.youtube.com/watch?v=GOWFCYepN2c
https://www.youtube.com/watch?v=p7iXEZGx2Mc
Adding triggers to a scene – https://www.youtube.com/watch?v=CSn0hENOIT0 
Movie textures – https://docs.unity3d.com/Manual/class-MovieTexture.html 
Unity video easy application – https://www.youtube.com/watch?v=p7iXEZGx2Mc 
Video clips – https://docs.unity3d.com/Manual/class-VideoClip.html 

First Person Set-up – CRASH and virus

Another issue with the scene was that I couldn’t navigate in Game Mode or the VR headset. I asked around to see if anyone could help. A friend suggested to download the Unity ‘starter assets’ and follow the set up below. I did this, but unfortunately the scene crashed and the coding wasn’t accurately imported so the project went into ‘Safe Mode’ and I couldn’t access the file without risking to loose my project.

I had to problem solve at this point by opening the scene on a Windows computer, download the same Unity version and discovered the file was accessible. Before this, I also had a potential virus attack when I opened Unity Hub on my computer. The file was called ‘with-love-from-america-txt‘ and it could have been another cause for the file problems. I reinstalled Unity Hubs and deleted the file to avoid any threats to my computer.

I asked a friend for help with this as he new how to set up Unity well. He helped me uninstall some programs, delete an extra camera in the scene and we added a plane from ProBuilder to add a floor to project for user to walk on. These little tweaks meant the scene could work on the headset but i still couldn’t move.

I found out I had to create a new scene and then move the assets over from the old scene as the file seemed to be faulty. I kept the old file incase the technician the following week could solve the navigation issue. The ground planes should have acted as the floor and the package I downloaded was meant to have the navigation tools ready to use however they didn’t.

References:
https://forum.unity.com/threads/malware-in-unity-hub-3-1-0-with-love-from-america-txt.1253856/
Followed instructions in link – https://github.com/Corysia/Unity-Oculus-Example

Lecturer Feedback on Project

The lecturer gave positive feedback on the scene and gave some advice to make it better. Unfortunately the scene crashed at this stage so I showed him the youtube video of the prototype I made earlier. He said how the silhouettes could have texture on the coloured layer to make them fit with the scene, the shadow behind them could be reduced in opacity so it’s less harsh. I needed to work on the fonts throughout whole of the scene to make it flow better.

Week Nine

Scene Development in Unity

This week, I learnt how to insert flat objects onto planes without a background on Unity. I initially discovered I couldn’t drag and drop PNG files into unity, so I tried this method and it worked. Then I inserted objects in parts of the scene so the user knows not to go down certain areas (instead of boundary lines).

Silhouette Development and Placement

This week I worked on making the silhouettes visible within the scenes. I worked on the positions of the silhouettes the previous week and edited, vectorised and inserted the coloured versions on-top of invisible flat objects. Having these vibrant colours gave a new level to the project. I also had to add and change characters colours throughout this process.

I changed the colour character codes as listed below:

Rita Caruso – Purple – bb59ff (CHANGED) Done
Antonino Caruso – Light Blue – 5693d2 (CHANGED) Done
Nunzio – Green – 48A9A6 Done
Nonna Caruso – Brown – 3C1518 Done

Pino Gambino – Yellow – ffdf4f (CHANGED) Done
Alfio Gambino – Blue – 38618C Done
Caterina Gambino – Red – FF5964 Done
Nonna Gambino – Orange – FF9C33 Done
Nina Gambino – Green – 56d288 Done

Guitarist – Orange – FF9C33 Done

Silhouettes in the Unity Scene

I kept the black silhouettes behind so you can see the characters more clearly.

References:
Silhouettes
shorturl.at/uvTV9 – man running
http://silhouettesfree.com/download-silhouette/guitarist-silhouette-2/ guitarist
shorturl.at/vyBPT – woman running 

3D Models in Scene
https://sketchfab.com/3d-models/fiat-strada-lowpolycarchallenge-d18048a6f7f04dad84a704aea1c02c5b – fiat
https://sketchfab.com/3d-models/fruit-veg-market-cf9d11b27bf7478a857a6abcbbb00cd3 – fruit market
https://sketchfab.com/3d-models/market-table-7de5195eeb26449a845d489e57cabc0b – Market Table
https://sketchfab.com/3d-models/trees-low-poly-1d2dcca2ccb1496c85b7cc5789a2a261 – trees
https://sketchfab.com/3d-models/renault-logan-2004-e4f9463f6e004b90bb977d12f6375b9c#download – car 
https://sketchfab.com/3d-models/3-pine-bushes-ddac4359daa94d6ea8e98832870b1e0e – 3 pine bushes
https://sketchfab.com/3d-models/lamp-post-2b6c56b1c93e4047998c0cccd3350f3f – lampost

Importing PNG’s Unityhttps://www.youtube.com/watch?v=CsSoqjNrA8o
https://www.youtube.com/watch?v=XDc_T6AZbts – used

Textures
polyhaven.com

Script Updating

I updated the scripts and took out characters which didn’t make the final cut. I updated the script video on Premiere Pro and noted the timings to follow etc and updated all scripts.

Audio Triggers in Unity

I followed the YouTube video above to insert audio files into the scene. Game objects were added around areas for audio triggers and also on preexisting objects. The audio triggers worked around the scene and I was able to stagger the audio around the scene so they don’t all play at once. This didn’t happen in the same way for the subtitle videos.

Try with English first and then try with other languages with buttons‘ – lecturer commented about the subtitles.

Skybox in Unity

To make the scene even more realistic, I added a skybox by following the tutorial above and inserting a texture from polyhaven. The texture was a scene of the beach from Mondello (near Palermo) so it worked well with the project. After this I had a challenge exporting my scene into the VR headsets, so I wasn’t able to see the scene in the Oculus up until this point.

References:
https://polyhaven.com/a/spiaggia_di_mondello
https://support.spatial.io/hc/en-us/articles/360059258471-Creating-a-Skybox

Week Eight

At the beginning of this week I presented my WIP to the class and received valuable feedback from my class and lectures.

Following this I made a list of the tasks I would need to complete over the next few weeks before the final presentation. This gave me peace of mind and meant I had tasks to follow to achieve the end product.

Photoshop Editing for Blender – UV Masks

editing 32 photos

I edited photos I took in Palermo to eventually insert into the 3D street scene on Blender. I made sure the buildings were flat and would be able to easily insert onto blocks later on.

I edited 32 photos at this point and also was given some advice to possible websites to use for finding and exporting 3D models. This included TurboSquid and PolyHaven. They also mentioned exporting in an obj or blend format specifically for Blender, then fbj for other programs such as Unity.

Silhouettes

I first sketched a few of the characters and how I wanted them to appear. They needed to be expressive and easy to read. After sketching, I found many examples online of silhouettes, adjusted them on Photoshop and Illustrator and then saved them into organised folders. Overall I needed to create over 20 silhouettes for 13 characters.

References:
shorturl.at/rAD29 
https://www.pngwing.com/en/free-png-nuguu
https://pngset.com/download-free-png-dhihr
https://www.freevector.com/elderly-women-silhouettes
https://pixabay.com/vectors/boy-child-dad-daughter-family-2022606/ 
https://pixabay.com/vectors/man-walking-confident-silhouette-2759950/
https://pixabay.com/vectors/silhouette-couple-people-man-woman-2480321/
https://pixabay.com/vectors/silhouette-isolated-man-people-3069733/
https://pixabay.com/illustrations/silhouette-man-come-in-direct-2632700/
http://clipart-library.com/free/standing-man-silhouette.html 
https://www.kindpng.com/imgv/TihiT_victory-boy-silhouette-icons-png-silhouette-of-a/
https://www.vectorstock.com/royalty-free-vector/black-silhouette-of-little-boy-pointing-to-sky-vector-22709572
https://www.onlygfx.com/police-officer-silhouette-png-transparent/
https://www.alamy.com/silhouette-of-two-elderly-women-walking-with-bags-from-the-store-image384298537.html
https://depositphotos.com/vector-images/old-woman-silhouettes.html
https://www.pngitem.com/middle/TioxoTx_positive-woman-silhouette-png-download-elderly-woman-old/
https://www.vectorstock.com/royalty-free-vector/silhouette-an-elderly-woman-with-a-cane-vector-24870407
https://www.dreamstime.com/stock-images-girls-fighting-silhouette-vector-two-black-color-image40431364
https://www.clipartmax.com/middle/m2i8m2b1Z5d3m2G6_man-and-woman-fighting-silhouette/
https://www.dreamstime.com/fight-silhouette-two-men-vector-image100555556
https://www.dreamstime.com/fight-scene-isolated-street-fighter-silhouettes-two-fighters-silhouette-over-white-background-image115966304
https://www.vhv.rs/viewpic/TTmwRR_people-silhouette-presenting-hd-png-download/
https://www.clipartmax.com/middle/m2i8b1d3Z5m2i8Z5_presenting-silhouette-person-present-business-presenting-person-silhouette/

Modifications – Italian Script & Video Subtitles

After having worked primarily on the English and Sicilian scripts, I went back and changed the Italian version so I could use it as an option for the user subtitles. I translated mainly from Sicilian and checked with friends to see if it all made sense. I then printed a cast list and my notes so I could see the progress I had made up until this point.

The second presentation feedback pushed me onto editing the reveal scene ‘NONNA!’ (5) and the fight scene (4). I spaced out the recordings in order to make the subtitles more legible.

SWITCH UP – Blender to Unity

Initially I wanted to create the entire scene in Blender and then import it into Unity, however after hearing from a fellow classmate about her experience and struggles with a similar process, I decided to avoid the same scenario and work primary on Unity. I also tried to work on Mozilla Hubs however didn’t let me upload 3D files. I uploaded my 3D street to Sketch Fab and it didn’t let me download after uploading the file (only with a premium account).

I inserted the scene I made in Blender into Unity and followed multiple tutorials on how to set up the scene in Unity. I also asked for help from a friend at this stage in order to understand what packages were necessary to download and not. By this stage I had to uninstall all of my Adobe Suite programs from my computer as there was NO STORAGE. Unity doesn’t require too much space, but the downloading process does. Also the process took a while, so I made sure I was doing other things during the installation.

Unity Storage Limitations

I exported the 3D Blender file and imported it into a new scene in Unity. I followed a few tutorials to get the scene set up and asked for some help with making sure that everything was set correctly. I then tried to attach the photos taken in Palermo which I adjusted on Photoshop before, onto the buildings but had some difficulties so I ended up recreating the scene with game objects and attached the photos to the squares. I made materials with all of the photos and inserted them onto the appropriate box sizes. The LinkedIn learning course I was following (<a href=”http://&lt;!– wp:paragraph –> <p>https://www.linkedin.com/learning/unity-3d-2021-essential-training – course</p> https://www.linkedin.com/learning/unity-3d-2021-essential-training – course) was very helpful at this stage as it clearly explained the navigation tools, materials etc that I was working with.

Adding Materials

References:
https://assetstore.unity.com/packages/tools/integration/oculus-integration-82022
Pro builder 
https://sketchfab.com/
https://hubs.mozilla.com/
Ground texture – https://www.sketchuptextureclub.com/textures/architecture/roads/paving-streets/cobblestone/street-paving-cobblestone-texture-seamless-07391
https://polyhaven.com/a/cobblestone_floor_08

Mozilla Hubs
https://www.youtube.com/watch?v=WoKuRH7-JhE – Importing Your Own 3D Model into Mozilla Hubs and Spoke
https://www.youtube.com/watch?v=x8hXCCe5X_4 – How to create architectural VR walkthroughs with online tools, Pt. 2: Mozilla Hubs 

Videos for using blender:
https://www.youtube.com/watch?v=hTro_QBEXR4 – 3D navigating in Blender
https://www.youtube.com/watch?v=NjflKgMepQs – How to Import Blender 2.8 & 2.9 to Unity
https://www.youtube.com/watch?v=Y7M-B6xnaEM – UV Unwrapping – Blender 2.80 Fundamentals

Unity learning:
https://www.youtube.com/watch?v=yxMzAw2Sg5w – How to Make VR Games in 2022 – Updated Unity VR Tutorial 
https://www.youtube.com/watch?v=EnPiRrQ_tBY – How to build Unity game on macOS for Windows in 3 minutes
https://www.youtube.com/watch?v=qsU4nM0L_n0 – MAKE GAMES WITHOUT CODE! – Unity 3D Game Kit
https://www.linkedin.com/learning/unity-3d-2021-essential-training – course
https://www.linkedin.com/learning/unity-3d-2021-essential-training/exercise-files?autoSkip=true&autoplay=true&resume=false&u=56743409 – LinkedIn learning course

Week Seven

Feedback from Lecturer

I asked for feedback on my project so far and presented the deck above to him. His response was positive and constructive. The suggestions and notes I took are mentioned below.

Create Mockups of the journey
– can be with blocks
– Understand the proportions of the buildings and streets etc

How many touch points will you have?
Guide the user
Using arrows etc
Glowing objects CTA

You can design just on Blender or Blender to Unity
Moving text in Blender
Sound in Unity
Headsets can connect with blender

Get rid of name ‘Native Walk’ and stick with ‘La Ladra della Salsa’ otherwise it will be distracting

Course (4hr) sent before – model kitchen

Hyper real is hard to accomplish – you don’t need to do it

Dogville (film) could be an option of layout. Simple techniques and scenes
https://en.wikipedia.org/wiki/Dogville

Theatre set design
You’re creating a film – the users explore it
You will think about lighting, user experience etc

Premiere Pro Interview Compilation

Editing the interview on Premiere Pro and making sure it was easy to follow was a fundamental part of this process. I used their editing tools to crop and simplify the video’s structure, and had to translate the Italian to English and transcribe the English. I tried automatic translation tools online however they weren’t accurate so I ended up doing it myself and with some friends help.

I also combined the audio registrations I took while recording with the videos from my Canon camera. The interview ended up being an additional part of the project instead of the main part as it would just be for those who are curious to learn more about the dialect itself from local Sicilians.

Premiere Pro Interview

References:
https://www.happyscribe.com/ – Used to translate but didn’t work well

Music used in interviews

Week Six

Live recording and Filming Locals

For this week I went to Palermo in person to collect the assets I needed for the project. The first thing I did on arrival was going through the script in Italian and Palermitan with some local people to get their opinion on the storyline and the flow of the overall script. When we did this, many changes were made to the Sicilian script when new sentences were added to build the story and make it even more relevant to the culture. Working with cast also meant I was able to pick up on different parts of the language myself and think of ways to incorporate them in the script/ interviews. Following this I had to make many changes to the English translation due to the many changes from the Sicilian one.

Having an open mind and being flexible to changes was key at this stage so the end product reflected the culture even more than before. This also meant working with the voice actors’ expression techniques when saying the script and making sure the lines were clear and recorded well.

All of the recordings were taken by my iPhone due to not being able to book out a proper recorder from the technicians at university (there was no equipment available before the flight). Due to Covid 19, some of the voice actors couldn’t meet in person so sent their voice notes to me from other parts of the city.

Interviewing Local Sicilians

The interviews of three Sicilians were filmed and recorded by myself with a Canon camera and my Iphone voice recorder. This was a fascinating part of the process as I was able to ask questions people might be curious to ask to locals of the city. I used the questions I prepared the week before and asked same questions to each person. I saved the files to compile together later on.

Recording Clips of the City and Taking Photos

To build the assets I could use for the 3D Blender creation of the city, I took photos of buildings and interesting objects around city. Below you will see a selection of the photos I took. In each shot I had to make sure the buildings were straight so they could be edited later in photoshop properly.

Whilst touring the city, I took audio samples of the sounds and music to eventually use behind script to set the overall scene. At one point there was a musician playing the song ‘Take Five‘ by Dave Brubeck on the guitar. I recorded this and added it later on to the intro of the script compilation.

Musician playing the song ‘Take Five’ by Dave Brubeck on the guitar

I gathered all of the assets I created and sorted them into folders on my computer, lining up the sounds to the appropriate voice actor recordings and the photos to another folder. At this stage backing up my files was key so I wouldn’t loose any fundamental footage/ clips.

Premiere Pro Audio Compilation

Premiere Pro was used to combine the script recordings and the various sound clips around Palermo. I created time lines for each scene by lining up the audios in the folders and then added them directly to the PP timeline and then edited them accordingly.

The part I most enjoyed was the fight scene (scene 3) where I worked on layering the audio clips alongside extra crashing and clinging sounds I found online and created in person.

Sound Clip References:
https://freesound.org/people/Nox_Sound/sounds/554367/ – Crashing
https://freesound.org/people/CastIronCarousel/sounds/216781/ – Ow!
https://freesound.org/people/SpaceJoe/sounds/488614/ – pots clang
https://freesound.org/people/SpliceSound/sounds/260180/ – boxing
https://www.youtube.com/watch?v=oROB_7A4oeI fight scene
https://www.youtube.com/watch?v=agUt-4yYBPs music palermo – festa a palermo privitera e il suo complesso, inspired by https://www.youtube.com/watch?v=s2eDNzVOX7c

The next part involved adding the script to the recording. I created a new PP file and added the recording to the timeline. Then I added two boxes for the background and started to add the Sicilian script above and the English below. I experimented with the text size and the colours for the boxes. I then decided that a certain colour would be used for each character. The list I created was as follows:

Premiere Pro – script and audios being combined

Colour identity of who is saying what:
Rita Caruso – Red – FF5964
Antonino Caruso – Blue – 38618C
Nunzio – Green – 48A9A6

Pino Gambino – Orange – FF9C33
Alfio Gambino – Blue – 38618C
Caterina Gambino – Red – FF5964
Nonna Gambino – Orange – FF9C33
Nina Gambino – Brown – 3C1518

With many amendments to the English script being made along the way, I spent a lot of time dedicated to this part as it was one of the most important elements to the VR immersive experience. I then exported the file as an MP4 and uploaded it to youtube to get feedback.

Peer Feedback from Video

‘Please could I send you the video of the audio and subs so far for some feedback? I need to know if it’s too quick etc… each scene will be broken up across the VR journey so it won’t we a continuous video but I have added a brief structure with the titles ‘Scene one’ etc. It’s very basic but just to give an idea of the structure of the experience.’

The feedback received was:
1 – Loved it. It’s already immersive. It is a bit quick, especially because they speak quick. Scene 3 happens too fast for me, but I love it.
2 – Some of the words are so quick I can’t read them… but does that matter? When you’re learning a language you can’t keep up with it and you miss things so it’s a part of the journey. It m makes it more realistic.
3 – Brilliant idea about the sauce thief as food is very important in their culture.
4 (Russell) –  (I asked if I should have a written part at the beginning instead of voice-over in English and he replied) It can be changed anyway so it isn’t too much of an issue.

Week Five

Native Walk Survey

To develop the project further, I created a survey where the participants were asked questions based around the project outcome and core intention “bringing dialects to life”. Below you will find the the survey results and feedback given by the participants.

This process helped me go on to better develop the project and gave me a wider perspective instead of just trusting in my ideas. I used Google Forms and Canva to create the presentation.

The questions I asked were:
How old are you? (Age)
How do you identify? (Gender)
Where are you from?
Tick the languages you know how to speak
English, Mandarin, Spanish, French, Italian, Arabic, Hindi

Do you know how to speak at least one dialect? (A dialect is a regional or social variety of a language distinguished by pronunciation, grammar, or vocabulary)

Yes/No

*If so what dialects can you speak?

‘A language dies every two weeks. Therefore culture fades along with it.’

How do you feel knowing this fact?
Disheartened
Happy
Angry
No reaction
Other

Would you be interested in hearing and interacting with a rare dialect in a virtual reality walk-through story?

Yes/No

Do you believe you would be exposed to the language more through immersive storytelling in virtual reality or through books/ videos?
Virtual Reality
Books/Videos
Both

Lastly, would you rather be immersed in a VR experience which was life-like or unrealistic/ cartoon-like?
Realistic
Unrealistic
Neither

Please add further comments here:___

Thank you for your time!

Branding the Project

At this point I started to think about the brand identity of the project. This included researching preexisting projects, writing main points to consider from this project and finding ways of combining inspired work with the main concept to create something new.

The colours I had in mind were red, orange, green and blue. The colours of the Italian flag needed to be included but the oranges of Sicily were even more important. I used a website called coolors.co to experiment with the colour palette and to better visualise the final choice. Below you can find the colour choices and mood boards referred to throughout the process.

After this I watched a few YouTube videos by Will Paterson which inspired ideas about Native Walk’s logo. The videos watched are listed below.

References:
https://coolors.co/b6244f-0a8754-ee8434-ffe74c-8ae1fc – Colour Palettes
Will Paterson logo creation video – https://www.youtube.com/watch?v=3FfDcmQT1Ls

Moodboard of logos

His approach to critiquing the logos created by Designers helped me understand the importance of keeping things simple and not over complicating the outcome. He mentioned ‘if you squint your eyes while staring at the logo and don’t understand what it is, then it won’t be memorable enough’. This comment helped me to start brainstorming ideas about the shapes I could use for the logo.

References for Logo Inspiration:
https://www.coe.int/en/web/portal/26-september-european-day-of-languages/former-editions
https://dribbble.com/shots/5812396-Walk-logo-concept
https://www.pinterest.co.uk/pin/585468020282714560/
https://bit.ly/3sA2OXT

Logos and Fonts for the project

After creating the logos digitally, I realised they didn’t look the way I wanted them to. I then decided to draw them by hand and asked for external opinions on their legibility and which one was the strongest idea.

Selection of Logos I created on Photoshop

I decided to go with the logo on the right which I made copies of in different colours.

Week Four

Subtitles in 3D Spaces

In order to help the user to navigate and understand the language, I looked into putting subtitles into the VR scene. In the end I couldn’t find a way of placing them in VR but instead in a 360 video.

Another reference I found (as seen above) helped me visualise how the subtitles could look in a gaming format. This immersive storytelling technique in VR inspired me to experiment with using an immersive panoramic scene with audio. Below you can find 360 bubbles I experimented with on Mozilla hubs and a short video of the experience.

The constant difficulty with using Mozilla Hubs

The main issue I faced while using Mozilla Hubs was keeping the polygon count below 50,000 triangles. I found by using photos I was able to cut down the numbers instead of inserting individual 3D objects.

Script Changes | Storyline, Structure and Translation into Palermitano

After having feedback from my lecturer, we discussed how the two storylines within the sketch wasn’t as clear as it could have been so I changed it in order to make the customer experience clearer. The narrative changed so that there are two rival families, one rich (the Gambinos) and one poor (the Carusos). They have a miss-understanding where both families believe the other had stolen their secreto tomato sauce recipe. As a result they fight and then realise the grandmas took the recipes in the end in order to bring the two families together.

After this session I had further feedback which is recorded in my WIP 1 post. I wanted to create a prototype with audio samples, look at youtube video with subtitles and audio and to look into script writing.

Re-writing the Script and Character Framing

Before re-writing the script, I looked into the different appearances and layouts of scripts so that I could further develop my own. I changed the alignment of the dialogue text and took out the character roles from the name sections.

References: https://www.yumpu.com/en/document/view/44975409/the-script-comedy-plays
https://www.studiobinder.com/blog/how-to-write-a-screenplay/

Following this research, I created a story-board (below)to clearly plan out what the storyline of La Ladra della Salsa would include. I wanted to make sure the story was short so that the dialogue could be adaptable around it. Considering Palermitan people speak in much longer sentences, I needed to make sure the main storyline was simple so the audience wouldn’t be too overwhelmed with the immersive experience.

La ladra della Salsa Plot chart

After this I looked into how the exposition, climax and resolution would look within the story. Having a look at references such as Geri’s Game and Partly Cloudy by Pixar, I was able to consider how the structure would be laid out for the project. To the left you can see the plot chart I created for La ladra della Salsa.

This then helped me to re-write the script and to make the story-line simple and easy to follow for the audience. Following this I re-wrote the script in Italian and then worked with some Palermitan friends of mine on the Palermitan translation.

References:
https://kaitlinbevis.com/2016/01/11/movie-monday-plot-and-lilo-and-stitch/
https://colaciccolablog.files.wordpress.com/2015/08/pixarshortfilmsplotcharts.pdf

Preparations for Sicily

The week before leaving to go to Sicily, I looked into casting the right voice actors for the characters. In order to clearly understand the characters I was envisioning, I made a table to create rough character profiles to follow. The characters with the lighter yellow are spoken roles and the rest are only placed in the scenes.

I wanted to interview Sicilian people while I was out there so the audience could listen to them via a podcast or watch them on YouTube. I made a list of questions (as shown above) to ask them in english and then translated them into Italian. The interview would most likely be held in Italian with english subtitles for the viewer to understand. The questions would be about the language and their relationship with it. I also made a To-Do list with the tasks I wanted to complete while in the country.

Week Three

Mozilla Hubs to Blender and Spatial

I created a prototype of the streets of Palermo in Spoke Mozilla Hubs and discovered limitations with poly count when inserting 3D characters and other objects to the scene. The audio clips I found online turned into videos instead of remaining sound clips. These issues led me to researching other ways of creating the environment on other platforms.

On twitter, I watched a video about Blender using geometry nodes and found it fascinating but then soon after realised how complicated it was to set up. The download link didn’t work for the version of Blender I have, however watching the clip inspired me to keep experimenting with the program.

Blender | Building Creation

After learning about different shortcuts and navigation tools on Blender by watching a youtube tutorial online, I was able to create a mockup street scene from scratch. This was a very rewarding experience as I could slowly begin to see my thoughts become a reality.

Below you will find a few sketches I made when taking a break from the screen and to visualise the colours and scenes I wanted to create on Blender.

I asked a friend to take photos of Palermo so I could use some references when creating the buildings. On the software I had to think about the different tools and shapes I was using which required me to think in a very new way. When looking at my references, I had to look at them from an architectural perspective in order to accurately replicate them in the 3D software.

References:
Building Creation Tips – https://www.youtube.com/watch?v=CmBMcYVW9x8

After creating a row of buildings in Blender, I looked into how I could eventually put them onto a VR platform so the audience could engage with the scene and the language. I started by looking at possibly uploading the work onto Mozilla hubs and found out how to reduce the poly-count of the buildings to optimise the UX. Then I saw that Unity and Spatial were other possible options to use.

References:
http://www.keris-studio.fr/blog/?p=11966 – Setting up a custom environments in Spatial
https://support.spatial.io/hc/en-us/articles/360058728892 – Spatial Custom Environments and 3D Model Preparation Guide
https://support.spatial.io/hc/en-us/articles/360048451852-Changing-the-Virtual-Environment – Changing the Virtual Environment
https://www.youtube.com/watch?v=JqoIGxUrLbw – How to use the Decimate Modifier

VR Exhibition | Gazelli Art House

I went to a VR exhibition in Gazelli Art House where my friends and I experienced 10 different virtual reality experiences. Attending this exhibition revealed many potential avenues I could explore in the project with virtual world creation and also inspired me to think about the aspects I wanted to include in my virtual scene.

Testing the VR

Sound played a very important role in every experience, turning visuals into a physical environment. Air Morphologies by Matterlurgy was the most impacting for me as I felt physically disturbed by the invasive sounds and objects surrounding me throughout the time. I knew I didn’t want this to happen to the viewers, but it inspired further research into sound recording for the languages.

MATTEO ZAMAGNI NATURE ABSTRACTION 2 

The piece above by Zamagni was surreal and fascinating, blending different scenes and narratives into the virtual experience.

References:
https://gazelliarthouse.com/usr/library/documents/main/introductory-brochure_vr-library_2021.pdf – PDF of Gallery Experience
https://player.vimeo.com/video/432518472?h=5c636b2899 – Matteo Zamagni Nature Abstraction VR video

Spatial Studio

I updated my studio for the following week’s presentation.

Story-telling and Script Writing

I then looked into different Sicilian stories for inspiration and thought of looking into the stories of Inspector Montalbano and The Legend of Beati Paoli. I wanted to create a narrative for the story based around similar characters and organisations. The aim was to make it simple yet memorable so users can be immersed in the language without feeling overwhelmed.

References:
Inspector Montalbano https://en.m.wikipedia.org/wiki/Inspector_Montalbano_(TV_series)#Season_1_(1999)Beati Paoli https://en.wikipedia.org/wiki/Beati_Paoli

I originally wanted to create a murder mystery plot, but then after research and considering the use of colours and visuals in the scenes, I decided to create a romantic comedy in the style of Shakespeares Romeo and Juliet. Below you will find the scripts I wrote in English and then a translation in Italian.

English Translation
Italian Translation

I contacted a friend from Palermo to help me brainstorm common names and surnames from the city. Creating this script helped me to better picture how I would like the environment to be laid out and having the scenes split up into 7 sections meant I could start to imagine how the layout of the streets would look etc.

The storyline is very simple and yet comedic which would engage the user to keep walking through the VR environment. I made sure to keep the Sicilian voices and personalities in my head so I could build the storyline purely influenced by the locals themselves.

Having friends from the Sicily and Italy helped me greatly in this section as I could ask them what they thought of the storyline in both languages and make changes accordingly.

The title ‘La Ladra della Salsa’ means ‘The Sauce Thief’ which perfectly lays out the comedy of the story. Following on from these translations, I had to find a way of translating the Italian language into Palermitano. I sent the script to different contacts to ask for guidance with the dialect and eventually I worked with a Sicilian lady who knew the dialect very well.

Design a site like this with WordPress.com
Get started